Friday, July 27, 2012

Kitchen Remodel Week 3

This week begins the finishing of the drywall surface and preparation for painting.


Day 1a - Tape and Mud
Covering up the old "skip trowel" texture on the old wall.

 covering up the seams and screws on the new sheetrock behind the counters.


Day 1b - Furnace Door
The furnace has a door to the outside and a few years ago I damaged it using a pressure washer a little too assertively. One of the things I asked the contractor to do was replace that door with an appropriate type so that when we get the house painted it would look good. They carefully removed the frame around the old door and set it aside and then removed the old door and put a new one in.

Day 2 - Cabinets Arrive
I received a call on my phone at work and it was the delivery truck driver calling to let me know they were dropping off my cabinets. I told him to call the contractor. Despite his prior arrangement to bring the cabinets later in the week, they were showing up that day. So, instead of doing more on the tape and mud, they received the cabinets to the side yard.

The night before we had picked out a color to try in the kitchen and bought a small sample from Home Depot so the contractor put it up on the wall behind where a cabinet will eventually be placed so that if we don't like it we won't have it show up through another color. He also brought in a cabinet from the pile and put it beside the paint color to see how well they matched.
Even though it looks pretty light in this picture, the paint is too dark to be used for all of the walls, so we needed to find another brighter color.


This is the cabinet that will go over the microwave/hood. It really looks nice up close, the wood and the workmanship is top notch. Sitting on top of the cabinet is the sample of the granite and a couple of other paint colors.

Day 3 - Contractor Personal Problem and new paints
Late Tuesday night I received an email that a close friend of the contractor had been severely injured and would be taking Wednesday off to attend to him and his family.  I met Sandi later that night
at Home Depot and picked out two more colors to try on the walls. I painted them on the wall so that they could dry by the next morning when the contractor would be here to talk with us about it.
While the first color was "lettered" by the contractor using the full size paintbrush, giving a house of horrors look, I asked Lauren to letter the names of the new colors. We will probably end up with Spring Hill or Chinese Jade as the main color in the room, but the Contractor suggested we could use Spring Walk along the wall behind the appliances to give it a contrast with the rest of the room.

Day 4 - Texturing
We decided to go with the more modern "orange peel" texture in the kitchen, so after the contractor did some more tape and mud to cover up the old texture and a lot of sanding, he applied the texture.

Day 5 - Painting begins
We decided to go with Spring Walk for the walls behind the appliances (on the right) and Spring Hill for the rest of the walls in the kitchen. Today the contractor primed and painted the ceiling and walls. You can see that the walls behind the cabinets were primed but won't be painted.

I took a number of pictures when I came home from work in order to see the paint in daylight, it's interesting to see the difference daylight vs. flash at night.


We tried to match the colors to the granite we're using, you can also see the orange peel texture.


Fortunately we're past the messiest steps, here's a picture of the screen on the back door
One more coat of paint Monday and the preparation for putting up the cabinets begins.

Saturday, July 21, 2012

Kitchen Remodel Week 2

This week saw the end of Demolition and the beginning of Construction.

With a day to ourselves on Saturday over we had the electrician show up on Sunday to start wiring up our new outlets in the open wall where our counters and appliances will be.

If you look closely you'll see both white and yellow wires. The white wires are 14 gauge wire and the yellow is 12 gauge. The thicker wire in the yellow jacket will allow up to 20 amp circuits if needed. The wires are routed to the corner so that a new breaker panel can be installed to service just the kitchen.
Once the wires were routed on Sunday by the electrician, the contractor took back over and started installing the recessed lights in the ceiling. There are lights over the counter/appliance area and along the back wall near the backyard. This has always been a dark area in our kitchen, apparently it will be nice and bright soon.

Thursday at lunch time we met the contractor at a marble/granite shop in downtown San Jose. I had no idea that there were at least 10 different counter-top companies all one two streets around Fry's in San Jose. We must have seen at least 100 different slabs of granite or marble. We initially thought that we wanted a light color, but since the contractor had brought the floor and a sample of the cabinet door that is the same color we have ordered, we eventually ended up going with a dark green color.
While this isn't the best photo you can see what we were seeing, the relationship between the floor color we already have and the door color we're going to have. This green with black really works well as a contrasting color. Since our contractor is pretty close to the owner of this particular shop, he was willing to break off a 3 inch corner of the material for us to use when choosing paint colors. I scanned the chunk on our scanner.
You can see light green, white and dark green. At this point we're debating whether we should copy these colors on to the side walls or have a light color that makes the dark counter material stand out.

By the end of Thursday the electrician had installed the circuit breaker panel and set it inside the wall enough that it looks really great instead of a big box hanging off the side of the building. It looks simple and that's a good thing in my book.

Today, Friday, the contractor decided that enough had been done in the walls so that he could close them up and get ready to texture and paint next week.


So now we have the house to ourselves for two whole days before the contractor comes back and starts "floating" the walls, applying an "orange peel" wall texture, then painting. We'll see what colors we chose next week.

Sunday, July 15, 2012

Kitchen Remodel Week 1

We, well the contractor, started the kitchen remodel this week. It worked out well that he would arrive just as everyone had left the house for Vacation Bible School or work. He had the place to himself for 5 hours a day and could make as much noise and dust as he wanted. I was pleasantly surprised at the amount of work he got done each day.

Starting point: Day 0
I took some pictures the night before we started so that we could remember what it used to look like at the last moment before we started the project.

I tried to get a view that can see all of the changes that will happen. Most of what you see will be gone by the end of the week.

Day 1 (prep the floor)
Since I had installed Engineered Hardwood Flooring less than 5 years ago the contractor didn't want to damage it so he brought in some heavy paper and covered that with plastic. Since the island in the middle of the room is actually sitting on top of the floor, he removed it so that he could have the most room to work and also get the floor covered as well as possible.


Day 2 (remove the cabinets)
On Day 1 he told me that he wasn't going to do "too much" well to my surprise he had completely removed all of the cabinets while we were away.

Day 3 (removing the popcorn ceiling)
When we were talking about painting the ceiling the contractor strongly suggested that we remove the popcorn ceiling that we have. Fortunately he knew what he was doing and was able to remove the ceiling material in one day. I don't have any pictures of the freshly scraped ceiling.

Day 4 (opening up the walls)
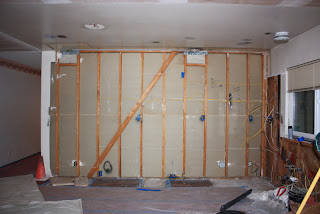
I guess I never really thought about the fact that we would be "going down to the studs" but we did.

Day 5 & 7 (electrical)
The contractor brought in a sub contractor to do the electrical work. He started on Friday and finished up on Sunday. We needed to have the house to ourselves on Saturday to recover from a long week of VBS and me working late on my work project. Most of the wiring is in place so that all that's needed now is placing the new circuit breaker panel and getting the sheetrock back in place.
What's on the plate for this week? We've been told to determine where any of our network cabling needs to be run so that work can be completed and pick out paint colors so that can start at the end of this week, or beginning of next week.