Friday, July 27, 2012

Kitchen Remodel Week 3

This week begins the finishing of the drywall surface and preparation for painting.


Day 1a - Tape and Mud
Covering up the old "skip trowel" texture on the old wall.

 covering up the seams and screws on the new sheetrock behind the counters.


Day 1b - Furnace Door
The furnace has a door to the outside and a few years ago I damaged it using a pressure washer a little too assertively. One of the things I asked the contractor to do was replace that door with an appropriate type so that when we get the house painted it would look good. They carefully removed the frame around the old door and set it aside and then removed the old door and put a new one in.

Day 2 - Cabinets Arrive
I received a call on my phone at work and it was the delivery truck driver calling to let me know they were dropping off my cabinets. I told him to call the contractor. Despite his prior arrangement to bring the cabinets later in the week, they were showing up that day. So, instead of doing more on the tape and mud, they received the cabinets to the side yard.

The night before we had picked out a color to try in the kitchen and bought a small sample from Home Depot so the contractor put it up on the wall behind where a cabinet will eventually be placed so that if we don't like it we won't have it show up through another color. He also brought in a cabinet from the pile and put it beside the paint color to see how well they matched.
Even though it looks pretty light in this picture, the paint is too dark to be used for all of the walls, so we needed to find another brighter color.


This is the cabinet that will go over the microwave/hood. It really looks nice up close, the wood and the workmanship is top notch. Sitting on top of the cabinet is the sample of the granite and a couple of other paint colors.

Day 3 - Contractor Personal Problem and new paints
Late Tuesday night I received an email that a close friend of the contractor had been severely injured and would be taking Wednesday off to attend to him and his family.  I met Sandi later that night
at Home Depot and picked out two more colors to try on the walls. I painted them on the wall so that they could dry by the next morning when the contractor would be here to talk with us about it.
While the first color was "lettered" by the contractor using the full size paintbrush, giving a house of horrors look, I asked Lauren to letter the names of the new colors. We will probably end up with Spring Hill or Chinese Jade as the main color in the room, but the Contractor suggested we could use Spring Walk along the wall behind the appliances to give it a contrast with the rest of the room.

Day 4 - Texturing
We decided to go with the more modern "orange peel" texture in the kitchen, so after the contractor did some more tape and mud to cover up the old texture and a lot of sanding, he applied the texture.

Day 5 - Painting begins
We decided to go with Spring Walk for the walls behind the appliances (on the right) and Spring Hill for the rest of the walls in the kitchen. Today the contractor primed and painted the ceiling and walls. You can see that the walls behind the cabinets were primed but won't be painted.

I took a number of pictures when I came home from work in order to see the paint in daylight, it's interesting to see the difference daylight vs. flash at night.


We tried to match the colors to the granite we're using, you can also see the orange peel texture.


Fortunately we're past the messiest steps, here's a picture of the screen on the back door
One more coat of paint Monday and the preparation for putting up the cabinets begins.

Saturday, July 21, 2012

Kitchen Remodel Week 2

This week saw the end of Demolition and the beginning of Construction.

With a day to ourselves on Saturday over we had the electrician show up on Sunday to start wiring up our new outlets in the open wall where our counters and appliances will be.

If you look closely you'll see both white and yellow wires. The white wires are 14 gauge wire and the yellow is 12 gauge. The thicker wire in the yellow jacket will allow up to 20 amp circuits if needed. The wires are routed to the corner so that a new breaker panel can be installed to service just the kitchen.
Once the wires were routed on Sunday by the electrician, the contractor took back over and started installing the recessed lights in the ceiling. There are lights over the counter/appliance area and along the back wall near the backyard. This has always been a dark area in our kitchen, apparently it will be nice and bright soon.

Thursday at lunch time we met the contractor at a marble/granite shop in downtown San Jose. I had no idea that there were at least 10 different counter-top companies all one two streets around Fry's in San Jose. We must have seen at least 100 different slabs of granite or marble. We initially thought that we wanted a light color, but since the contractor had brought the floor and a sample of the cabinet door that is the same color we have ordered, we eventually ended up going with a dark green color.
While this isn't the best photo you can see what we were seeing, the relationship between the floor color we already have and the door color we're going to have. This green with black really works well as a contrasting color. Since our contractor is pretty close to the owner of this particular shop, he was willing to break off a 3 inch corner of the material for us to use when choosing paint colors. I scanned the chunk on our scanner.
You can see light green, white and dark green. At this point we're debating whether we should copy these colors on to the side walls or have a light color that makes the dark counter material stand out.

By the end of Thursday the electrician had installed the circuit breaker panel and set it inside the wall enough that it looks really great instead of a big box hanging off the side of the building. It looks simple and that's a good thing in my book.

Today, Friday, the contractor decided that enough had been done in the walls so that he could close them up and get ready to texture and paint next week.


So now we have the house to ourselves for two whole days before the contractor comes back and starts "floating" the walls, applying an "orange peel" wall texture, then painting. We'll see what colors we chose next week.

Sunday, July 15, 2012

Kitchen Remodel Week 1

We, well the contractor, started the kitchen remodel this week. It worked out well that he would arrive just as everyone had left the house for Vacation Bible School or work. He had the place to himself for 5 hours a day and could make as much noise and dust as he wanted. I was pleasantly surprised at the amount of work he got done each day.

Starting point: Day 0
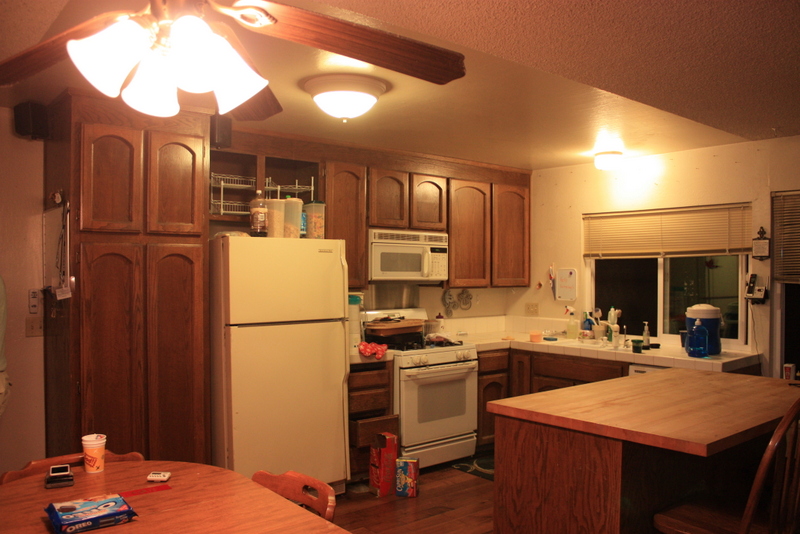
I took some pictures the night before we started so that we could remember what it used to look like at the last moment before we started the project.

I tried to get a view that can see all of the changes that will happen. Most of what you see will be gone by the end of the week.

Day 1 (prep the floor)
Since I had installed Engineered Hardwood Flooring less than 5 years ago the contractor didn't want to damage it so he brought in some heavy paper and covered that with plastic. Since the island in the middle of the room is actually sitting on top of the floor, he removed it so that he could have the most room to work and also get the floor covered as well as possible.


Day 2 (remove the cabinets)
On Day 1 he told me that he wasn't going to do "too much" well to my surprise he had completely removed all of the cabinets while we were away.

Day 3 (removing the popcorn ceiling)
When we were talking about painting the ceiling the contractor strongly suggested that we remove the popcorn ceiling that we have. Fortunately he knew what he was doing and was able to remove the ceiling material in one day. I don't have any pictures of the freshly scraped ceiling.

Day 4 (opening up the walls)
I guess I never really thought about the fact that we would be "going down to the studs" but we did.

Day 5 & 7 (electrical)
The contractor brought in a sub contractor to do the electrical work. He started on Friday and finished up on Sunday. We needed to have the house to ourselves on Saturday to recover from a long week of VBS and me working late on my work project. Most of the wiring is in place so that all that's needed now is placing the new circuit breaker panel and getting the sheetrock back in place.
What's on the plate for this week? We've been told to determine where any of our network cabling needs to be run so that work can be completed and pick out paint colors so that can start at the end of this week, or beginning of next week.

Saturday, June 16, 2012

Replacing our Awning/Arbor/Pergola, gutter and patching stucco

Before

After

When we first bought our house we had a redwood deck and simple awning over our backyard patio right outside our back door. One of the things that the house inspector identified as a problem was a lot of rotting on the deck. I eventually pulled out the deck and repaired the 4x4 uprights holding up the awning. Even at that time I knew the awning needed to be replaced, but I didn't have the time or budget to do it right, that was 10 years ago.

We had a contractor come and look at replacing our kitchen, but we also wanted to fix up a few things on the outside of the house and I walked him around to all of the things that I thought were issues with the house that needed care. The immediate concern was the main beam holding up the awning. It was made of 3 boards screwed or nailed together and were rotted so bad it seemed that it could fall down at any moment. He first quoted me on replacing the beam, but I realized the whole thing was rotting so I had it replaced.
One of the things I never cleaned up from removing the deck was one of the concrete pylons that held up the deck was left behind in the dirt.

Looks pretty small when you see that 2x4 next to it, but it's like an iceberg. Here's the rest of the concrete below the surface
I guess they really wanted that deck to stay in place!

When he tore down all of the boards, even the ones tying the awning to the wall of the house, I was surprised to see this scallop pattern

 It looks like there was a corrugated plastic or metal roof over our deck at one time. This is why it would have been slanted instead of flat like most wooden awnings.

When the contractor was installing the awning he was continually giving me options for how much slant, if any, did I want, did I want decorative or flat ends etc. etc. I was very pleased with how it turned out.


In addition to the awning needing replacement, I had never patched the stucco outside the sliding glass door from the floor repair and installation.


I also realized that the gutter on the west side of the house was slanted the wrong way so it always had water in gutter after it rained, this caused it to eventually rust through and start dripping rusty water on the ground.


 The gutter installer decided the simplest way to fix the drainage issue was to connect the long run of the gutter to the short run on the roof extension.


Saturday, January 22, 2011

Installing a replacement attic ladder

The attic ladder in our garage never really seemed right. When we first moved in, it didn't "stretch out" all the way when it was open. Turns out the original installers skipped a "critical step" in the instructions, the didn't cut the extra length off the legs of the ladder and it made it not work correctly. That was 16+ years ago and I finally replaced it this week with a new unit and oriented correctly along the trusses instead of across them.


We use the attic ladder about 6 times a year, twice at Christmas time, Easter and some other random holiday. Not something to think much about, but as time wore on, the ladder wore out. After I realized that the legs were too long I contacted the manufacturer and they emailed me the original instructions. There in big BOLD letters was the phrase "DO NOT CUT TRUSSES" I realized that the original installers had also skipped that step and installed the ladder by cutting apart the bottom of the truss to make it so the ladder would open along the length of the garage instead of the width. Unfortunately cutting trusses makes them weak. A truss is a triangle made up of smaller triangles, if you cut any one of those triangles you make the whole structure weak and can end up causing damage. I realized that not only did I need to install a new ladder and cut the legs to the right length I had to turn the ladder 90 degrees and install it along the trusses. The ladders are even made to fit between 24" on center truss alignment, which I have in my attic.

Mind you I didn't just figure this out, I've known about this literally for years, I've just put it off. A few months ago Sandi made a todo list for the house and on it was the attic ladder. I had Martin Luther King Jr. day off from work and while cleaning up my email I noticed the todo list and thought "I could get this done today and that would be a great use of a day off" little did I know.

Taking out the ladder was a lot harder than I expected. While most of the nails that had originally been used to install it were loose there were some that were nailed in to other boards that themselves were loose. The whole structure was completely unstable. I removed all but four screws I had put in later to stabilize it. I had hammered out one end of the ladder box since one side of the ladder was no longer being held up by a spring assembly. This allowed me to work on each side separately, what I did not realize was the spring assembly that was attached would bring the exposed nails slashing across my arm as I removed the last screw. It was one of those moments when you think, gosh I wish I hadn't done that. It's not an emergency, but I really don't want to get blood on this nice shirt. Tyler had been helping me so I sent him in to get Sandi she was in no rush to come out because I told her not to, I realized that she did need to rush and we got it bandaged up and I was back to work. Now I had a hole in the ceiling with a three cut trusses and a bunch of extra cross bracing I no longer needed. I removed all of the old cross bracing, it was what the ladder was attached to, and prepared to repair the trusses.
Since the trusses were cut, I bought some "green" 2x4" lumber to "sister" along the trusses and screw between the sister and the original truss. Since the truss had been cut, the ceiling of the garage had started to sag. I knew I needed to jack the ceiling back up so I grabbed a sturdy bucket, flipped it over, put a 2x6 on there and a car jack. Then I stood up one of the 8 foot 2x4" and another piece of wood at the top to spread out the pressure. I turned the jack as Tyler watched the new 2x4 and the existing truss "level out" I wasn't really sure how far I should jack it up, I just wanted both sides of the cut truss to be even and I figured the only way that would happen is if the truss was jacked to be level with the shorter side first, screw it in, then move the jack to the other side where more sagging had happened and screw that together. Little did I know.

In the process of vacuuming out accumulated insulation and dust I discovered that one of the trusses on the other side of a joint was cracked. I used all 8 feet of the 2x4 to extend past that point and screw the cracked truss to the new lumber. I will eventually go back and drill bolt holes and put a reinforcing plate on there. Cutting the truss had no only caused the truss to expand, it also caused it to pivot around a point and cause it to crack.
It took me so long to fix the first two trusses that I stopped for the night. I bought another non-green 2x4" the next day to fill in the places that were cut out and used it to jack up the last of the three cut trusses and screwed that all down tight.
The next night I cut out the opening for the new ladder.
Now we're at Thursday night and all is set for getting the ladder in the attic, unfortunately we had company and Tyler was busy so I thought I would rig up my own little pulley system so that I could have the ladder hang in the right place while I nailed it in. This worked pretty well until the come along that I was using as a pulley got above the ceiling and I couldn't make it move any more. Tyler and the person visiting him helped me lift the ladder in to place in then use the provided metal straps to hang it from the rafters. Unfortunately even though the instructions specifically said that the opening was supposed to be 22 1/2" x 54" the ladder was about 3/4" shorter in each dimension. I really didn't want to have 3/4" on one side of the ladder so I purchased a 1x4 (which is really 3/4" on one dimension) to fill in that space. I took Friday night off and wanted to get done on Saturday.
I removed some of the nails I had initially put in and attempted to fit the 3/4" board in the space between the truss and the ladder. It wasn't 3/4" the whole way, so I had to sledge hammer the board in as far as possible. I could then start the final nailing of the ladder to the attic. I wanted the ladder to hang straight, so I used a level at the top. The instructions indicated that there are six places where you put a nail through a metal brace and drive it home to transfer as much of the motion during use directly to the supporting beams. Unfortunately they put those holes really close to the spring and I only have a hammer with a really large face. I spent the next hour or so hammering, unbending the nail, hammering some more, unbending the nail, pulling out nails that were completely bent, hammering in new ones. I was pretty happy that all of the nails were fully installed and there wasn't going to be any damage due to the nails coming loose.

One step remained to actually have the ladder in the attic, cutting the legs.
Like I said earlier, the reason the ladder failed initially was that the legs were never cut. If you don't cut the legs you put a lot of stress on the wood in places it's not designed to receive. Fortunately the instructions are simple, fold the bottom most section up out of the way and measure how far it is from the end of each side of each board to the floor. They cut it at the factory square, but you cut it at an angle to match the floor. Fortunately the measured spots ended up just below the metal rod that supports the bottom most step. Due to the sloped nature of the garage floor the side nearer the garage door is slightly lower. I cut the legs and the garage door side was 1/4" too long. I cut that off too and the bottom most step is almost on the floor, but it is very stable, something I've never felt in a garage ladder at our house.
Now all that remained was the minor job of repairing the sheetrock since it is the firewall for the house. I had the piece that I had cut out for the new ladder, but there wasn't enough to cover all of the opening that was there so I bought an entire 4x8' sheet bummed that I was only going to use about 2x5' but they don't sell it any smaller.
I got home and cut out the damaged pieces and was ready to cut one more piece and the whole area fell out of the ceiling. Since I had an 8' long piece, I went ahead and cut it all the way back to where it wasn't damaged almost 8' and all 4' across. The only thing we had to do was cut out a little in where the door was and take about an inch off the end since the trusses weren't exactly 8' apart. We measured the required opening, cut the sheetrock and test fit it. It didn't fit. I had to cut an additional 1/2" or so off one end in order to get it to fit. The cut I had made wasn't very square and it was interfering. Once we got it up there, we put drywall screws about every 6 inches and held it in place. Sheetrock is pretty heavy, and this was only 1/4" stuff, I can't imagine anything heavier in that spot. We would have had to have some sort of jack, instead we just used our heads, literally.

So, now that the trusses are repaired, the ladder is installed, the sheetrock is replaced, all we have to do is put the "flooring" back in up in the attic. The previous installation had two 8' sections of 1/4" plywood as the floor. Since the ladder has changed in position and orientation, we'll need to cut those pieces to fit, and get some more for the other side. Otherwise you can't really put anything in the attic without it sitting on the weak sheetrock.