Saturday, August 18, 2012

Kitchen Remodel Week 6

The end is near, the finishing touches are being applied and we are starting to move back in to the ktichen.

The new Dishwasher was installed and is working now.
Not much to say about it except that it seems to be working.

However the Reverse Osmosis filter is another story, we kept the original filter and when the contractor went to install it he found that I had cracked one of the "finger tightened" nuts by using more than my fingers to tighten it the first time I installed it years ago. For some reason wehn I installed it there wasn't an issue with leaks, but he couldn't get it to work without dripping. Fortunately the company that makes the unit still sells pieces on their web site. I ordered a new piece and it should be here next week. I had previously used the RO water to feed the refrigerator ice maker. Now that we have a new refrigerator with TWO ice makers it was important to get that going and it seems to be working OK, albeit slowly. We now have a fridge with water and ice in the door.

The next big finishing step was to install the baseboard around the outside of the floor. One of the things I never completed when I installed the floor five years ago was installing the quarter round around the edge of the kitchen like I did in the living room. Turns out, I should have done a little more homework and made the space between the edge of the boards and the wall be 1/4 inch or less, instead I set it at 1/2 inch. Fortunately my contractor was able to come up with an elegant solution

There is a white baseboard with the original quarter round from the floor installation. It covers the gap and provides a nice transition

More finishing work was done on the window sills and sliding glass door frame. Another example of something that I had put off from when it was originally done, oh 10 years ago or so, was painting the frame of the "new" sliding glass door we got when the retrofit windows were installed. I always knew we'd get around to fixing up the kitchen.


The last finishing touch that got done this week was adding the wood panel to the back of the island. I had never known that an island wasn't sold as a single piece. I always assumed that the thing in the kitchen was brought in a one big piece, however I learned during the design process at Lowe's that you select the pieces that you want and then they're screwed together to make the front look nice, but the backside needs to be covered in order to make it look nice. A single piece of 1/8th inch thick veneer was purchased with the cabinets so that the contractor could cover it up. That got done this week:
BEFORE:
AFTER:

There are corner pieces that will cover the seam between the cabinet walls and the veneer along the back. As you can see there is a duplex outlet on one end of the island and another under the shelf on the end near where the kitchen table is located.

One final thing I did this week was swap out the incandescent floods for fluorescent and LED lights. We now have 6 recessed light cans, that original had 65W incandescent bulbs, for a total of 390Watts. The Fluorescent and LED bulbs are 13Watts each for a total of 78 Watts, a savings of 312 Watts, which was mostly heat, for the same amount of light. Think of it this way, turn your hair dryer on low and that's how much heat we were unnecessarily pouring in to the kitchen. Sandi had actually started this by asking if there was any way to reduce the heat coming from the lights. There is a "problem" with the fluorescent lights they come on dim and slowly "warm-up" to a full glow. The LED light comes on quickly but costs literally 10 times what the fluorescent costs.

For next week we needed to have the pendant lights for over the island, so we chose the mini-pendants lights from Lowe's that look like this:
Hopefully they will look nice in our kitchen.

Next week: Exterior House Paint, we have to choose yet another thing! Hopefully we're coming round the corner on wrapping up this project. While we're getting the outside painted we have to move in to the kitchen, clearing out the garage so that we can move the living room items in there to complete the popcorn ceiling removal project. Of course, we're going to have to paint in there too, so that's another thing to have to pick. Oh well, I'm thankful that simply having to make choices is the hardest part of this project.

Saturday, August 11, 2012

Kitchen Remodel Week 5

The word for this week is Granite!

We took a day for vacation on Monday, but the contractor didn't so when we came home there was plywood in place on top of the cabinets underneath where the granite will go. I don't know why, but I was surprised to see it.

The next day our appliances arrived and I got a call from Sandi and the contractor making sure that we had received the refrigerator we actually wanted. Refrigerators are much larger now than they were when we bought our last one almost 20 years ago. You can get a "normal" or "Cabinet depth" fridge. The "counter depth" fridges are generally smaller interior volume and cost more. So thinking we wanted a good size fridge and didn't want to pay extra we bought the normal size. Turns out normal means "Sticks out pretty far from cabinets."
The contractor said that we could still return it if we wanted to, but I chose to keep it.


 In these two pictures you can see the sink sitting about where it will be mounted and that the oven/range has been put in place.

We needed to decide on a faucet by Wednesday night so that the contractor could pick it up on his way to our house Thursday and install it after the sink and granite were in place. Who knew that choosing the faucet would literally keep us up after midnight trying to make the right choice. We looked at Home Depot to get a feel for what they had, then went to Lowe's and saw that there were three that really matched what we wanted. Sandi wanted to look online and see what the reviews were before we made a choice. Turns out every one of the faucets that we saw at Lowe's had glowing reviews for those that had just installed them, but the rest of the reviews were from those that had owned them for 1 to 3 years. Most of these people were complaining about what broke or leaked. We finally gave up and told the contractor that we just couldn't choose and needed to talk to him the next day. The only advice he gave was that hard water causes all plumbing to fail and that they are all pretty much the same. We picked a faucet we had looked at the night before and went on with life.

Thursday was granite installation day. We had selected a large piece of granite at the shop in downtown San Jose and the contractor had a "fabricator" in mind that would take this piece of grantie and fit it to our kitchen. Some of the questions he had were "how tall of a backsplash" my answer "whatever is normal." We also wanted to put something behind the stove and below the built in microwave. Previously we had a piece of stainless steel, but the fabricator thought there would be enough material to make that out of granite too.

When I came home Thursday afternoon, it was all done.
The L shaped piece that starts at the Dishwasher and ends at the oven/range is a solid piece. We had initially talked about how the fabricator would choose the best place to put the seam between the pieces around the sink, but he was able to keep it all one piece.
The sink is stainless steel with a coating on the outside and sound absorbing panels so that it doesn't act like a big drum. The sink on the right is smaller than the left and holds the garbage disposer. There are four holes in the granite, one for the main faucet, one for the water filter faucet, one for a soap dispenser and one for the dishwasher drain air gap. We are going to get a new water filter faucet to match the stainless steel look of the sink and main faucet. The main faucet came with a matching soap dispenser.

The contractor also installed the built in microwave over the oven/range.
 
He's concerned that it's a bit loud when it's running, so he said not to use it until he decides if it can be fixed or just exchanged.


The cabinet in the lower corner has a lazy Susan so we can reach whatever gets hidden back in there. We also have under counter lighting so that we can see back in to the corners up there.

Next week should see the dishwasher being installed and the island being bolted down to the floor in the middle of the room.

Saturday, August 4, 2012

Kitchen Remodel Week 4

Day 1 - Paint and floors
The contractor applied another coat of paint to the ceiling because he wasn't happy with the way it looked. He also started prepping the floor for the appliances that fit between the cabinets. Since the cabinets are shifting slightly to the left he add to add some flooring to fill in where I hadn't put the floor down years ago.
Flooring Modified


Cabinets brought in to start hanging

Cabinets brought in to start hanging
By the end of the day the contractor had brought in most of the upper cabinets prepping to put them in the next day. He has put them on the floor in the order they will go on the wall, except for the piece on the far right, with the open 4 shelf unit going right up against the window over the sink. The cabinet on the far right in this picture ends up at the left of the rest of these over the refrigerator.

Day 2 - Cabinets on the wall!

I called home during the day and my son told me that the contractor was assembling the cabinets on the floor in order to hang them up on the wall as one big piece that's already completely lined up.


By the end of the day we had cabinets on the wall, but I was warned "not to play with them." So here is a simple picture, no moving cabinet doors :-)


Day 3 - Contractor day off

Day 4 - Sink base and Island put in place

I never realized that the island cabinets were actually an assembly of cabinets that you can pick and choose what you want. As part of the promotion they were giving a "free" garbage can cabinet. We decided that it would fit well on the left side of the island, and the tall cabinet that we lost to the left of the sink would work well on the right side of the island. The large cabinet in the middle would serve to hold dishes pots and pans etc. in the bottom and assorted items in the drawer in the middle on the top.


Day 5 - Island completion and knobs/handles

We chose to keep our butcher block top from the old island and save some money on the granite counter tops. So the contractor fully assembled the island and put the butcher block on top of it. One of the last steps will be sanding, bleaching and re-surfacing the wood so that it can look as nice as the rest of the counters.

One of the things I thought about while choosing where to put the garbage can is that you have to use a hand to hold the garbage and another to open the cabinet. What if you could open the garbage cabinet with your foot? I ordered an extra handle and had the contractor place it on the bottom of the garbage cabinet door and now I can open the garbage with my foot:


Cabinet doors have knobs, drawers have handles.

The granite counter top "fabricator" came to the house today to take final measurements for the counters and will start making the pieces from the larger piece we saw a few weeks ago.


The contractor told us today that we get to move in to the kitchen starting next Friday, let's hope that's true.

Friday, July 27, 2012

Kitchen Remodel Week 3

This week begins the finishing of the drywall surface and preparation for painting.


Day 1a - Tape and Mud
Covering up the old "skip trowel" texture on the old wall.

 covering up the seams and screws on the new sheetrock behind the counters.


Day 1b - Furnace Door
The furnace has a door to the outside and a few years ago I damaged it using a pressure washer a little too assertively. One of the things I asked the contractor to do was replace that door with an appropriate type so that when we get the house painted it would look good. They carefully removed the frame around the old door and set it aside and then removed the old door and put a new one in.

Day 2 - Cabinets Arrive
I received a call on my phone at work and it was the delivery truck driver calling to let me know they were dropping off my cabinets. I told him to call the contractor. Despite his prior arrangement to bring the cabinets later in the week, they were showing up that day. So, instead of doing more on the tape and mud, they received the cabinets to the side yard.

The night before we had picked out a color to try in the kitchen and bought a small sample from Home Depot so the contractor put it up on the wall behind where a cabinet will eventually be placed so that if we don't like it we won't have it show up through another color. He also brought in a cabinet from the pile and put it beside the paint color to see how well they matched.
Even though it looks pretty light in this picture, the paint is too dark to be used for all of the walls, so we needed to find another brighter color.


This is the cabinet that will go over the microwave/hood. It really looks nice up close, the wood and the workmanship is top notch. Sitting on top of the cabinet is the sample of the granite and a couple of other paint colors.

Day 3 - Contractor Personal Problem and new paints
Late Tuesday night I received an email that a close friend of the contractor had been severely injured and would be taking Wednesday off to attend to him and his family.  I met Sandi later that night
at Home Depot and picked out two more colors to try on the walls. I painted them on the wall so that they could dry by the next morning when the contractor would be here to talk with us about it.
While the first color was "lettered" by the contractor using the full size paintbrush, giving a house of horrors look, I asked Lauren to letter the names of the new colors. We will probably end up with Spring Hill or Chinese Jade as the main color in the room, but the Contractor suggested we could use Spring Walk along the wall behind the appliances to give it a contrast with the rest of the room.

Day 4 - Texturing
We decided to go with the more modern "orange peel" texture in the kitchen, so after the contractor did some more tape and mud to cover up the old texture and a lot of sanding, he applied the texture.

Day 5 - Painting begins
We decided to go with Spring Walk for the walls behind the appliances (on the right) and Spring Hill for the rest of the walls in the kitchen. Today the contractor primed and painted the ceiling and walls. You can see that the walls behind the cabinets were primed but won't be painted.

I took a number of pictures when I came home from work in order to see the paint in daylight, it's interesting to see the difference daylight vs. flash at night.


We tried to match the colors to the granite we're using, you can also see the orange peel texture.


Fortunately we're past the messiest steps, here's a picture of the screen on the back door
One more coat of paint Monday and the preparation for putting up the cabinets begins.

Saturday, July 21, 2012

Kitchen Remodel Week 2

This week saw the end of Demolition and the beginning of Construction.

With a day to ourselves on Saturday over we had the electrician show up on Sunday to start wiring up our new outlets in the open wall where our counters and appliances will be.

If you look closely you'll see both white and yellow wires. The white wires are 14 gauge wire and the yellow is 12 gauge. The thicker wire in the yellow jacket will allow up to 20 amp circuits if needed. The wires are routed to the corner so that a new breaker panel can be installed to service just the kitchen.
Once the wires were routed on Sunday by the electrician, the contractor took back over and started installing the recessed lights in the ceiling. There are lights over the counter/appliance area and along the back wall near the backyard. This has always been a dark area in our kitchen, apparently it will be nice and bright soon.

Thursday at lunch time we met the contractor at a marble/granite shop in downtown San Jose. I had no idea that there were at least 10 different counter-top companies all one two streets around Fry's in San Jose. We must have seen at least 100 different slabs of granite or marble. We initially thought that we wanted a light color, but since the contractor had brought the floor and a sample of the cabinet door that is the same color we have ordered, we eventually ended up going with a dark green color.
While this isn't the best photo you can see what we were seeing, the relationship between the floor color we already have and the door color we're going to have. This green with black really works well as a contrasting color. Since our contractor is pretty close to the owner of this particular shop, he was willing to break off a 3 inch corner of the material for us to use when choosing paint colors. I scanned the chunk on our scanner.
You can see light green, white and dark green. At this point we're debating whether we should copy these colors on to the side walls or have a light color that makes the dark counter material stand out.

By the end of Thursday the electrician had installed the circuit breaker panel and set it inside the wall enough that it looks really great instead of a big box hanging off the side of the building. It looks simple and that's a good thing in my book.

Today, Friday, the contractor decided that enough had been done in the walls so that he could close them up and get ready to texture and paint next week.


So now we have the house to ourselves for two whole days before the contractor comes back and starts "floating" the walls, applying an "orange peel" wall texture, then painting. We'll see what colors we chose next week.

Sunday, July 15, 2012

Kitchen Remodel Week 1

We, well the contractor, started the kitchen remodel this week. It worked out well that he would arrive just as everyone had left the house for Vacation Bible School or work. He had the place to himself for 5 hours a day and could make as much noise and dust as he wanted. I was pleasantly surprised at the amount of work he got done each day.

Starting point: Day 0
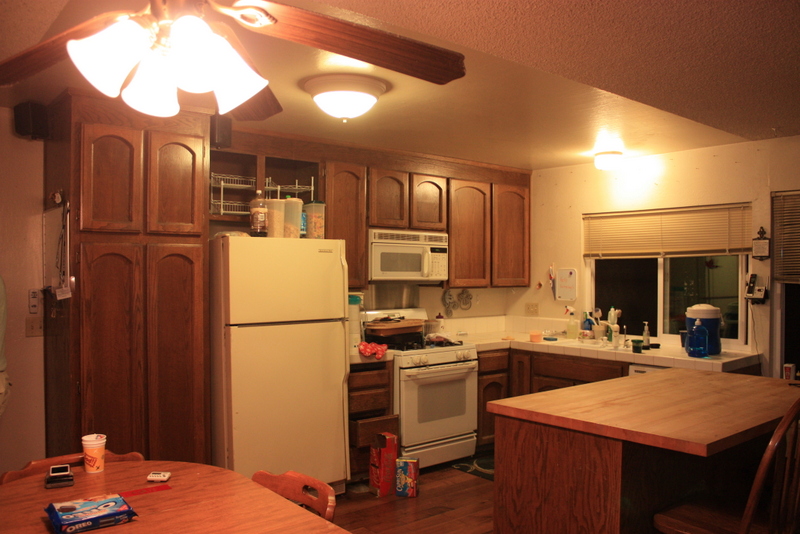
I took some pictures the night before we started so that we could remember what it used to look like at the last moment before we started the project.

I tried to get a view that can see all of the changes that will happen. Most of what you see will be gone by the end of the week.

Day 1 (prep the floor)
Since I had installed Engineered Hardwood Flooring less than 5 years ago the contractor didn't want to damage it so he brought in some heavy paper and covered that with plastic. Since the island in the middle of the room is actually sitting on top of the floor, he removed it so that he could have the most room to work and also get the floor covered as well as possible.


Day 2 (remove the cabinets)
On Day 1 he told me that he wasn't going to do "too much" well to my surprise he had completely removed all of the cabinets while we were away.

Day 3 (removing the popcorn ceiling)
When we were talking about painting the ceiling the contractor strongly suggested that we remove the popcorn ceiling that we have. Fortunately he knew what he was doing and was able to remove the ceiling material in one day. I don't have any pictures of the freshly scraped ceiling.

Day 4 (opening up the walls)
I guess I never really thought about the fact that we would be "going down to the studs" but we did.

Day 5 & 7 (electrical)
The contractor brought in a sub contractor to do the electrical work. He started on Friday and finished up on Sunday. We needed to have the house to ourselves on Saturday to recover from a long week of VBS and me working late on my work project. Most of the wiring is in place so that all that's needed now is placing the new circuit breaker panel and getting the sheetrock back in place.
What's on the plate for this week? We've been told to determine where any of our network cabling needs to be run so that work can be completed and pick out paint colors so that can start at the end of this week, or beginning of next week.