We finished installing the island a week ago and got all of the dishes washed and put back in their places in the various drawers in the island. I'd show you a picture, but let's just say the rest of the kitchen isn't exactly ready for a photo shoot. We plan on buying some new furniture, storage cabinets, for the kitchen, so we haven't been able to bring all of the school books, food and dishes back in their place in the corner. We are hoping to buy a nice china cabinet, but we've been a little busy to decide on exactly which one.
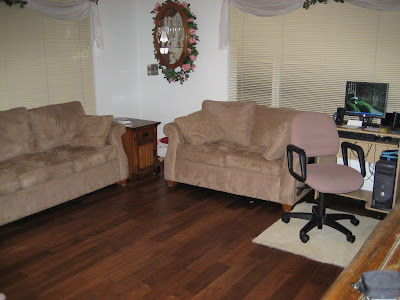
In the Living Room, the only piece of furniture that is not completely back in its place is the piano. It is still sitting on the piano dolly near its spot. We bought two 5foot x 8foot area rugs for the floor, basically covering the empty space between the couches and the piano. I have mixed feelings about installing this beautiful floor, then covering it up with a rug, no matter how nice that rug looks.
The next big steps are in the kitchen. We need to decide on new cabinet doors and new counter tops. Somewhere in the sequence is painting the kitchen as well.
Friday, September 28, 2007
Saturday, September 15, 2007
Island's back in the kitchen
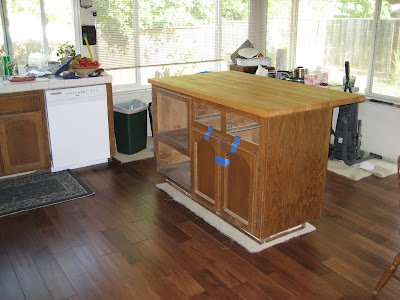
Today was the day I was going to get the island back in the Kitchen, well it's almost back.
I wanted to do a little upkeep on the island while I still had it in the yard. Two things were needed, refinishing the surface of the butcher block and making the two outlets on the backside become four so that we can plug in more items on the butcher block. It would have been nice to be able to do the complete refinishing to match the new cabinet doors, but that decision has not yet been made.
We cleared an area around the island out on the backyard patio and got out the 100 grit sand paper and an orbital sander.
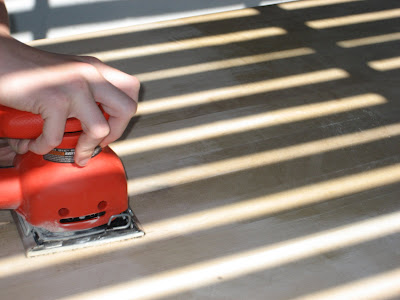
In the picture above you can see the area around the sander is almost white compared to the browner area not yet sanded. I am not sure but there was some kind of finish on the surface, perhaps varnish or mineral oil. We spent quite a while going over the whole area then we went back and cleaned up any of the shallow can stains or knife cuts we could get out.
After we completed the sanding and cleaned up as much as possible, we wanted to wait until all of the work was done before applying any new finish.
Since we often use the butcher block as a place to recharge our cell phones it would nice to have more outlets available. When we first moved in there was a microwave oven under the butcher block sort of built in to the island. When we installed the new oven we have a microwave above the stove, so the one in the island was unnecessary but its outlet was hidden in the back of the cabinet, not very handy for hooking up cell phones. I decided we were going to install two sets of outlets on the edge of the island for a total of four outlets. I went to the local home improvement store and picked up a "dual-gang" "old-work" box to use. Dual-gang simply means you can put two of something in the box, a light switch and an outlet, two outlets or whatever. Old-work means that you are putting a new conduit box in an "old" wall or something. I used a jigsaw to open up the existing outlet hole and installed the box and wired up two new outlets to fit in that spot.
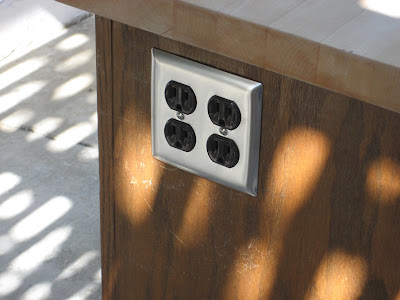
I would have liked to have a brown dual outlet cover plate, but the stainless steel will work for now.
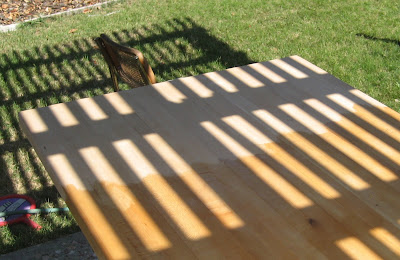
Once we had the outlet installed we got back to the Butcher Block refinishing we started earlier. Based on what I had read about refinishing Butcher Blocks, I had gone to Home Depot to purchase Mineral Oil instead of varnish or any other normal wood finish. Funny thing, Home Depot doesn't sell Mineral Oil, the guy in paint sent me to the kitchen remodeling department that guy said "we don't sell it, maybe a grocery store." So after I picked up a few other things, I headed to my local Lucky store. Yes, they have Mineral Oil. No it's not in the furniture polish section, it's in the laxative section. I guess if you took a good swig of that stuff, it would definitely do the job. I wasn't sure how much I'd need, but they only had one size of bottle, so I purchased that and went home.
Applying mineral oil to a freshly sanded wood surface is like applying Hot Chocolate to a frozen Christmas Caroler, it really brings out the color.
Once we had completed the Mineral Oil application we let it sit for a while to soak in and wiped it down with a dry towel just to be sure it wasn't slippery. We carried the island back in to the kitchen and set it on a large piece of carpet to protect it from scratching the floor. My son put the blue tape on the doors to keep them from swinging open as we moved it.
My wife had suggested that we bring the island in to the kitchen instead of trying to remember from pictures exactly where it had been. Instead we got it generally where we thought it was supposed to be then opened the dishwasher to see how close it would be when the door was open. We also wanted to see how cramped the kitchen table would be with it in place. We found a good place that allowed the dishwasher to open and still be able to walk by, but not too close to the kitchen table.
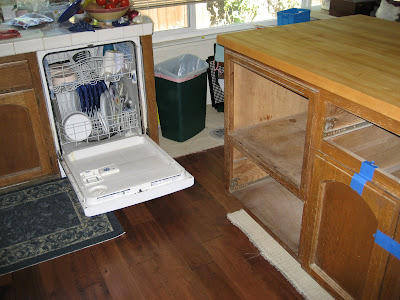
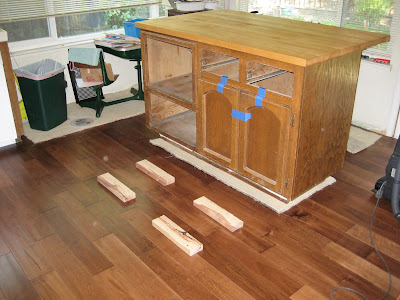
Once we had it in a place that we liked, I took some measurements so we could move the island away and prepare the floor to hold it in place. My friend had suggested that instead of "toe-nailing" the island to the floor I should screw down some 2x4's to the floor then screw through the "toe-kick" of the island to hold it down. This allows us to have screws making complete contact. This required us to pre-drill the 2x4's then hold them in place while drilling through to the floor and sub-floor, then putting three inch screws straight down. Yes, I actually drilled in to my perfectly good floor. I figure if someone wants to take out the island in the future, it will at least have a complete floor under it, with some wood putty to apply.
Here's a picture of what it looks like when all of the 2x4's are in place. There are a few more pictures in the photo album.
We also drilled a one inch hole through the floor for the power wire to come up from underneath. Unfortunately we weren't able to grab the wire and pull it through, so my son will have to go under the house tomorrow to get the wire and push it through. Once that wire is through we can lift the island on top of the four blocks, align with my earlier measurements, then screw the toe-kick to the sides of the 2x4's. Hopefully that will happen painlessly so we can clean up the rest of the island and get the drawers back in and start to get the kitchen back in order. It's been a long time coming.
After we get the island back in place, we really need to find some storage furniture for some of our dishes and our school materials that we keep in the kitchen. Right now some of that stuff is out in the garage, and some of it is at the end of the hall.
It's also pretty clear from the picture above that the wood color is completely different. We really need to start choosing our new cabinet faces and get that ball rolling soon. Oh boy, I get to spend more money!
I wanted to do a little upkeep on the island while I still had it in the yard. Two things were needed, refinishing the surface of the butcher block and making the two outlets on the backside become four so that we can plug in more items on the butcher block. It would have been nice to be able to do the complete refinishing to match the new cabinet doors, but that decision has not yet been made.
We cleared an area around the island out on the backyard patio and got out the 100 grit sand paper and an orbital sander.
In the picture above you can see the area around the sander is almost white compared to the browner area not yet sanded. I am not sure but there was some kind of finish on the surface, perhaps varnish or mineral oil. We spent quite a while going over the whole area then we went back and cleaned up any of the shallow can stains or knife cuts we could get out.
After we completed the sanding and cleaned up as much as possible, we wanted to wait until all of the work was done before applying any new finish.
Since we often use the butcher block as a place to recharge our cell phones it would nice to have more outlets available. When we first moved in there was a microwave oven under the butcher block sort of built in to the island. When we installed the new oven we have a microwave above the stove, so the one in the island was unnecessary but its outlet was hidden in the back of the cabinet, not very handy for hooking up cell phones. I decided we were going to install two sets of outlets on the edge of the island for a total of four outlets. I went to the local home improvement store and picked up a "dual-gang" "old-work" box to use. Dual-gang simply means you can put two of something in the box, a light switch and an outlet, two outlets or whatever. Old-work means that you are putting a new conduit box in an "old" wall or something. I used a jigsaw to open up the existing outlet hole and installed the box and wired up two new outlets to fit in that spot.
I would have liked to have a brown dual outlet cover plate, but the stainless steel will work for now.
Once we had the outlet installed we got back to the Butcher Block refinishing we started earlier. Based on what I had read about refinishing Butcher Blocks, I had gone to Home Depot to purchase Mineral Oil instead of varnish or any other normal wood finish. Funny thing, Home Depot doesn't sell Mineral Oil, the guy in paint sent me to the kitchen remodeling department that guy said "we don't sell it, maybe a grocery store." So after I picked up a few other things, I headed to my local Lucky store. Yes, they have Mineral Oil. No it's not in the furniture polish section, it's in the laxative section. I guess if you took a good swig of that stuff, it would definitely do the job. I wasn't sure how much I'd need, but they only had one size of bottle, so I purchased that and went home.
Applying mineral oil to a freshly sanded wood surface is like applying Hot Chocolate to a frozen Christmas Caroler, it really brings out the color.
Once we had completed the Mineral Oil application we let it sit for a while to soak in and wiped it down with a dry towel just to be sure it wasn't slippery. We carried the island back in to the kitchen and set it on a large piece of carpet to protect it from scratching the floor. My son put the blue tape on the doors to keep them from swinging open as we moved it.
My wife had suggested that we bring the island in to the kitchen instead of trying to remember from pictures exactly where it had been. Instead we got it generally where we thought it was supposed to be then opened the dishwasher to see how close it would be when the door was open. We also wanted to see how cramped the kitchen table would be with it in place. We found a good place that allowed the dishwasher to open and still be able to walk by, but not too close to the kitchen table.
Once we had it in a place that we liked, I took some measurements so we could move the island away and prepare the floor to hold it in place. My friend had suggested that instead of "toe-nailing" the island to the floor I should screw down some 2x4's to the floor then screw through the "toe-kick" of the island to hold it down. This allows us to have screws making complete contact. This required us to pre-drill the 2x4's then hold them in place while drilling through to the floor and sub-floor, then putting three inch screws straight down. Yes, I actually drilled in to my perfectly good floor. I figure if someone wants to take out the island in the future, it will at least have a complete floor under it, with some wood putty to apply.
Here's a picture of what it looks like when all of the 2x4's are in place. There are a few more pictures in the photo album.
We also drilled a one inch hole through the floor for the power wire to come up from underneath. Unfortunately we weren't able to grab the wire and pull it through, so my son will have to go under the house tomorrow to get the wire and push it through. Once that wire is through we can lift the island on top of the four blocks, align with my earlier measurements, then screw the toe-kick to the sides of the 2x4's. Hopefully that will happen painlessly so we can clean up the rest of the island and get the drawers back in and start to get the kitchen back in order. It's been a long time coming.
After we get the island back in place, we really need to find some storage furniture for some of our dishes and our school materials that we keep in the kitchen. Right now some of that stuff is out in the garage, and some of it is at the end of the hall.
It's also pretty clear from the picture above that the wood color is completely different. We really need to start choosing our new cabinet faces and get that ball rolling soon. Oh boy, I get to spend more money!
Thursday, September 13, 2007
Sky no longer falling
We rearranged a little in the garage in order to get a ladder under the falling ceiling and put a bunch of drywall screws in to hold the material back in place. Before we screwed it back up, we removed the two cabinet doors that were weighing it down. I also removed a few of the nails that pulled out during the fall down.
Not much progress these days as little things seem to take a long time, but eventually we will have everything back in its place.
Not much progress these days as little things seem to take a long time, but eventually we will have everything back in its place.
Monday, September 10, 2007
If it's not one thing, its another - AKA the Sky Is Falling!
I went out to the garage last night to grab some ice cream and what do I see:
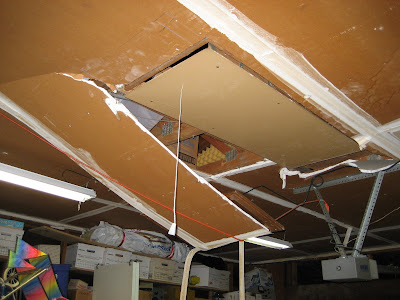
Yes, the drywall of the ceiling has come loose and is only staying up because of the orange extension cord powering the garage door opener. So, that's on the list to get fixed soon.
We cleaned up the back yard patio tonight. It was the work area and had lots of tools, sawdust and other junk laying around. We were able to get the patio table and chairs back in place, but we still have the butcher block island and microwave cart out on the patio so it's a little cramped.
We are trying to figure out how big of an area rug we need for the living room. We put blue tape down at 5 feet and 8 feet apart to see how that size of area rug would fill the room. It might be a little small, so we are going to look for something at least 8 feet by 8 feet.
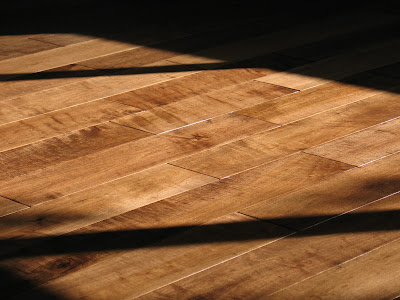
I took a picture one Sunday morning after the floor was in, but the furniture wasn't so I guess that was last weekend. I though the sun streaming in lighting up the floor was very nice.
Yes, the drywall of the ceiling has come loose and is only staying up because of the orange extension cord powering the garage door opener. So, that's on the list to get fixed soon.
We cleaned up the back yard patio tonight. It was the work area and had lots of tools, sawdust and other junk laying around. We were able to get the patio table and chairs back in place, but we still have the butcher block island and microwave cart out on the patio so it's a little cramped.
We are trying to figure out how big of an area rug we need for the living room. We put blue tape down at 5 feet and 8 feet apart to see how that size of area rug would fill the room. It might be a little small, so we are going to look for something at least 8 feet by 8 feet.
I took a picture one Sunday morning after the floor was in, but the furniture wasn't so I guess that was last weekend. I though the sun streaming in lighting up the floor was very nice.
Saturday, September 8, 2007
Slowly - Normalcy Returns
We took a week off for vacation. Today we started putting the living room back together.
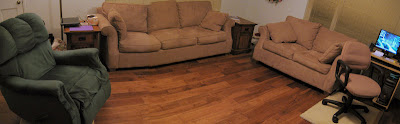
In this panorama shot you can see the green chair, the sofa, the love seat, the two end tables and the new computer desk.
My goal for today was to get all of the furniture that belongs in the living room, in the living room. This required that we put felt feet on all of the things we could, or cut old carpet scraps to use as temporary pads until we can choose what exactly we will use under the recliner and the desk chair.
In addition to getting the existing furniture back in place, we also brought the new roll top desk in and put it in its place.
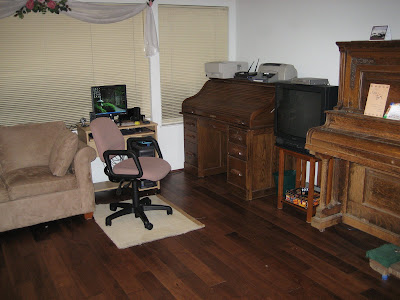
We have temporarily put the printers and internet wiring on top of the roll top desk until we can get a combination TV/Printer stand for the middle of the living room wall next to the desk and the piano. This may or may not be reasonable, but at this time it gets the internet and printers working and gives us a good idea how much space we have for a TV stand. As you can see the piano is still up on the piano dolly and I will need some help to get it down and on to its rubber feet catches for the rollers. We definitely don't want it rolling around on the hardwood floor, intentionally or by earthquakes etc.
We now have a good idea how big of an area rug we need to cover the space, but we don't want to cover all of that hard work, so we will be looking at our options. Most of the area rugs at Wal-Mart are 8 feet by 5 feet. At this point I have no idea how much of the floor that would cover. But we need to get something soon and get the coffee table in here so I can put my feet up and watch TV!
I have to admit sitting in here without the big desk and with the dark floors I really feel like the character of the room has really changed. I'm sure it helps that there is a big open space in the middle of the room without the coffee table. I was talking to a friend today that said he painted and put "can" lights in his living room ceiling. I have been thinking of that prospect myself. The benefit of "can" recessed ceiling lights is that they are very good down light. The down light is good for lighting up reading or highlighting items on a wall. In our living room, it would also reduce the glare from the primary light source being right in the middle of the room. While we really like the appearance of the fan/light combo in the middle of the room, the fan blades have a stroboscopic effect on the light when the fan is on. The fan blades "cut" through the light and that light pattern swirls around the room. If I can put in can lights that won't be happening. We can reduce the amount of light coming from the fan light module, still have some to light up faces etc., but significantly reduced. I could even put in a light block to prevent the light from going up and being "cut" by the blades. This would also be a form of down-light, but would be distributed by the frosted globe of the fan light.
Tomorrow is another big day at church, so I'm sure little will happen on the home front. As soon as possible I need to measure out where the island goes and start prepping the floor for that to go back in. I'm hoping to do some of the pre-work on the island before it comes back in the house so I don't have to sand the butcher block and then sweep up from that. The butcher block needs a good resurfacing, something we have never done. It also will need whatever treatment the rest of the cabinets receive. It seems like the cabinets in the rest of the kitchen were chosen to match the cabinets on the island. In that light, the easy to remove veneer of wood on the old cabinets is the actual wood of the island, so it will have to be covered with whatever we choose to resurface the rest of the cabinets. All that to say, we need to figure out what if anything can be done to the island before it's brought back in.
In this panorama shot you can see the green chair, the sofa, the love seat, the two end tables and the new computer desk.
My goal for today was to get all of the furniture that belongs in the living room, in the living room. This required that we put felt feet on all of the things we could, or cut old carpet scraps to use as temporary pads until we can choose what exactly we will use under the recliner and the desk chair.
In addition to getting the existing furniture back in place, we also brought the new roll top desk in and put it in its place.
We have temporarily put the printers and internet wiring on top of the roll top desk until we can get a combination TV/Printer stand for the middle of the living room wall next to the desk and the piano. This may or may not be reasonable, but at this time it gets the internet and printers working and gives us a good idea how much space we have for a TV stand. As you can see the piano is still up on the piano dolly and I will need some help to get it down and on to its rubber feet catches for the rollers. We definitely don't want it rolling around on the hardwood floor, intentionally or by earthquakes etc.
We now have a good idea how big of an area rug we need to cover the space, but we don't want to cover all of that hard work, so we will be looking at our options. Most of the area rugs at Wal-Mart are 8 feet by 5 feet. At this point I have no idea how much of the floor that would cover. But we need to get something soon and get the coffee table in here so I can put my feet up and watch TV!
I have to admit sitting in here without the big desk and with the dark floors I really feel like the character of the room has really changed. I'm sure it helps that there is a big open space in the middle of the room without the coffee table. I was talking to a friend today that said he painted and put "can" lights in his living room ceiling. I have been thinking of that prospect myself. The benefit of "can" recessed ceiling lights is that they are very good down light. The down light is good for lighting up reading or highlighting items on a wall. In our living room, it would also reduce the glare from the primary light source being right in the middle of the room. While we really like the appearance of the fan/light combo in the middle of the room, the fan blades have a stroboscopic effect on the light when the fan is on. The fan blades "cut" through the light and that light pattern swirls around the room. If I can put in can lights that won't be happening. We can reduce the amount of light coming from the fan light module, still have some to light up faces etc., but significantly reduced. I could even put in a light block to prevent the light from going up and being "cut" by the blades. This would also be a form of down-light, but would be distributed by the frosted globe of the fan light.
Tomorrow is another big day at church, so I'm sure little will happen on the home front. As soon as possible I need to measure out where the island goes and start prepping the floor for that to go back in. I'm hoping to do some of the pre-work on the island before it comes back in the house so I don't have to sand the butcher block and then sweep up from that. The butcher block needs a good resurfacing, something we have never done. It also will need whatever treatment the rest of the cabinets receive. It seems like the cabinets in the rest of the kitchen were chosen to match the cabinets on the island. In that light, the easy to remove veneer of wood on the old cabinets is the actual wood of the island, so it will have to be covered with whatever we choose to resurface the rest of the cabinets. All that to say, we need to figure out what if anything can be done to the island before it's brought back in.
Saturday, September 1, 2007
Wrapping it up, in the Living Room
I spent most of the day putting the molding down in the Living Room and doing some finishing touches to get the room ready for the furniture to be put back in place.
The picture shows the new TV and Phone jacks that I put in the corner, and that the wall has been painted, and that the molding has been put down and the putty is covering the holes from the finishing nails in the molding and the face nailed boards. Whew, what a day!
After getting the car fixed (a relay was bad in the radiator fan system) I put down another coat of paint on the walls hoping to get the gloss to match better. I guess we must have used "eggshell" and not "satin" oh well, at least the color is correct, so unless you stand just right you can't tell that the paint is wrong. I made sure to finish the painting last night so I could do the molding today.
In addition to painting the walls we also had to cut some of the door jams so the quarter round molding would fit under them and cover the expansion space left over when we installed the boards. We also had to fill in where a board was not quite long enough to properly be covered by the molding.
After doing all of the prep, I decided to read a little about installing the molding and discovered one important pointer, when joining two boards together to run along a wall longer than one piece of material you need to cut the two boards at an angle. Then overlap these two angles with the "point" showing away from the common view angle. This allows the boards to not show the border quite as much. Fortunately the chop saw has a 22.5 degree angle setting. Using this setting I could cut the first and second boards and install them with finishing nails. The biggest problem I had installing them was that the finishing nails weren't quite long enough to reach the wood underneath the drywall. Sometimes I would get a good contact and the board would snug up tight against the wall. Sometimes however the nail would just go through the drywall and not really snug up against anything. I guess I need to go get some longer nails and do those areas again.
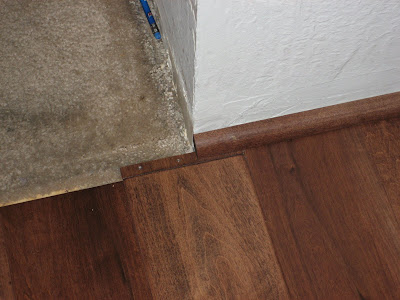
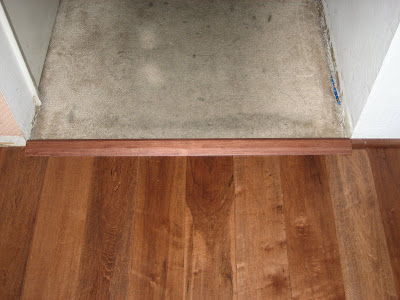
We also cut down the special molding for interfacing from the flooring in the kitchen to the hallway carpet.
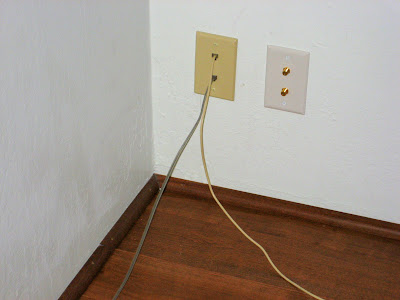
After getting the molding in place, I needed to put in the TV and phone wiring in to nice boxes on the wall. I found the dual Phone jack that I wanted at Fry's but it had to have a full conduit box in the wall to hold it in place. I went to Home Depot to pick one of those up, but while I was in that aisle I mentioned to the HD employee that I didn't need a whole conduit box and he said "Oh, have you seen this 'low voltage' type of box?" It has a ring that is held in to place in the wall with plastic tangs that flip out and hold it in place in the wall. The ring has two screw holes for the phone jack in place. I also put the TV jack plate in place using the provided metal plates.
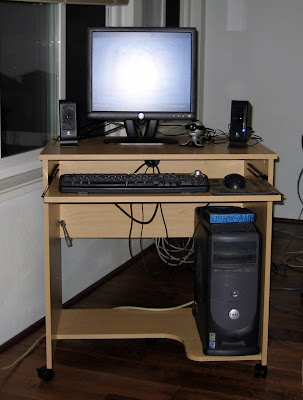
Since we no longer have the big desk, we needed a good place to keep the computer. We had thought it might be able to fit under the roll top, but it just barely doesn't fit. So we went ahead and got a cheap computer cart and put it together tonight.
I really want to get the Living Room back in shape before we leave on our week long vacation. Hopefully we can do some of that during the afternoon on Sunday.
The picture shows the new TV and Phone jacks that I put in the corner, and that the wall has been painted, and that the molding has been put down and the putty is covering the holes from the finishing nails in the molding and the face nailed boards. Whew, what a day!
After getting the car fixed (a relay was bad in the radiator fan system) I put down another coat of paint on the walls hoping to get the gloss to match better. I guess we must have used "eggshell" and not "satin" oh well, at least the color is correct, so unless you stand just right you can't tell that the paint is wrong. I made sure to finish the painting last night so I could do the molding today.
In addition to painting the walls we also had to cut some of the door jams so the quarter round molding would fit under them and cover the expansion space left over when we installed the boards. We also had to fill in where a board was not quite long enough to properly be covered by the molding.
After doing all of the prep, I decided to read a little about installing the molding and discovered one important pointer, when joining two boards together to run along a wall longer than one piece of material you need to cut the two boards at an angle. Then overlap these two angles with the "point" showing away from the common view angle. This allows the boards to not show the border quite as much. Fortunately the chop saw has a 22.5 degree angle setting. Using this setting I could cut the first and second boards and install them with finishing nails. The biggest problem I had installing them was that the finishing nails weren't quite long enough to reach the wood underneath the drywall. Sometimes I would get a good contact and the board would snug up tight against the wall. Sometimes however the nail would just go through the drywall and not really snug up against anything. I guess I need to go get some longer nails and do those areas again.
We also cut down the special molding for interfacing from the flooring in the kitchen to the hallway carpet.
After getting the molding in place, I needed to put in the TV and phone wiring in to nice boxes on the wall. I found the dual Phone jack that I wanted at Fry's but it had to have a full conduit box in the wall to hold it in place. I went to Home Depot to pick one of those up, but while I was in that aisle I mentioned to the HD employee that I didn't need a whole conduit box and he said "Oh, have you seen this 'low voltage' type of box?" It has a ring that is held in to place in the wall with plastic tangs that flip out and hold it in place in the wall. The ring has two screw holes for the phone jack in place. I also put the TV jack plate in place using the provided metal plates.
Since we no longer have the big desk, we needed a good place to keep the computer. We had thought it might be able to fit under the roll top, but it just barely doesn't fit. So we went ahead and got a cheap computer cart and put it together tonight.
I really want to get the Living Room back in shape before we leave on our week long vacation. Hopefully we can do some of that during the afternoon on Sunday.
Subscribe to:
Posts (Atom)