and did my project slip.
I had planned on putting in a full day at the office and then do some work on the house tonight.
Well, I received a call that the Van was overheating so I had to leave the office early and get the car in the shop, then that shop called and said it was an electrical issue and I had to find another shop to repair it.
Now, instead of working on the house, I'm working on my job.
P.S. As I walked through a tiled hall at work this morning, I kept noticing that the corners of the tiles were slightly mis-aligned, you know, an 1/8th of an inch or so. Man, I'm warped.
Thursday, August 30, 2007
Wednesday, August 29, 2007
And on the 43rd day, John rested
I took the day off from the office and read a book all morning.
Well, I returned the rental tools, but no actual work took place...
Well, I returned the rental tools, but no actual work took place...
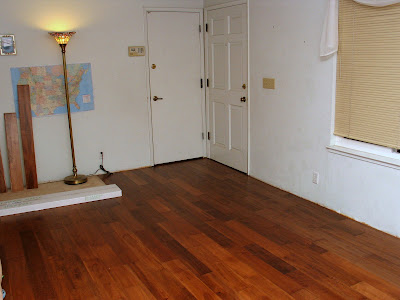
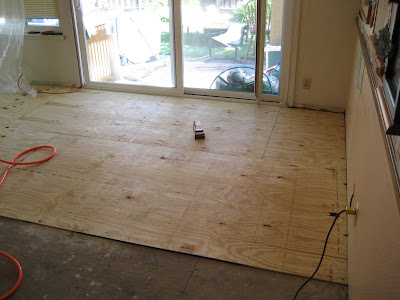
Flooring Finished, now it's time to wrap it up!
The three boxes of flooring that I ordered yesterday did arrive here on time for me to pick them up on the way home from work and I was able to finish installing the flooring.
Before we installed any flooring tonight, we folded back the tar paper and wrote on the plywood underlayment "Joshua 24:15 As for me and my house we will serve the Lord" directly under the entryway flooring. I realized to late that I should have taken a picture.
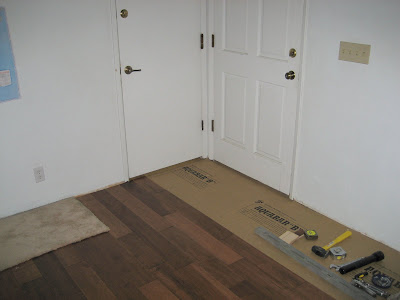
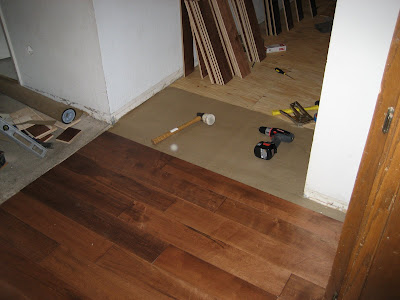
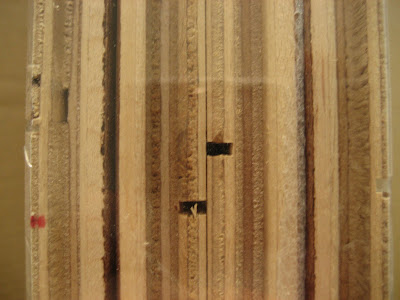
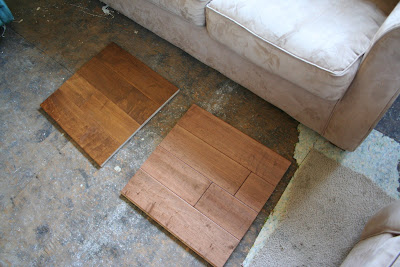
My son was a really good helper tonight, he made sure I had boards and tools and we were finished with the "easy" stuff by about 9PM. However when I got over to the corner where the two doors are and it was the last run, it got a little interesting. I thought I had layed out the first run of flooring in the kitchen such that I would end up with 2-1/2 inches to install on the other end. I ended up with about 1/2 inch. Either we accumulated 2 inches of slack over 33 feet, or I miscalculated. Given my recent bouts with mis-calculations, I am going to go with that. I had to rip down a five inch wide board to 11/16ths or smaller in some cases. I took a picture and enhanced the contrast and color to show the very small section left, the full size plank is five inches.
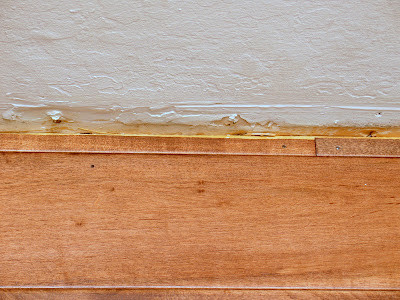
At first I thought I might be able to get away without a small board at the end, but as you can see in the next picture, the quarter-round molding just doesn't cover out that far.
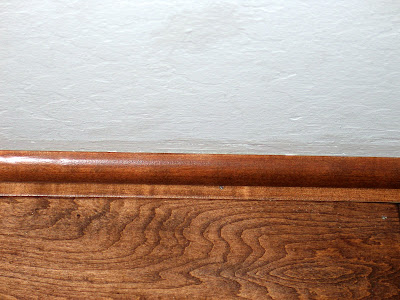
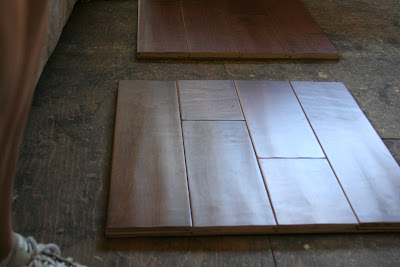
This shows what it will look like once it is installed. I have to wait on installing the molding, since I made a mistake on painting the gap. I used Semi-Gloss instead of a flatter paint for the wall. So I need to go back to Home Depot and ask for the same color, just in a flat paint that I can use on the walls, then install the molding. Once that's done, we can start putting on the felt pads for the different furniture, including the piano, and get our living room back in order. My wife did a great job straightening up the kitchen today, since all of the appliances were hooked up and I was out of the way with tools etc.
I intentionally bought one extra box for future needs, but I think I may have bought too much, since I had quite a few boards left over. It is hard to tell exactly how much material you are going to need since you end up cutting away excess material on the ends many times.
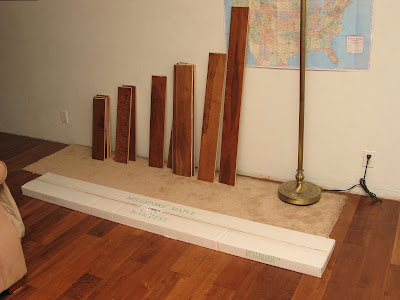
Now I need to wrap those boards up tight in something, as well as the box on the floor, and put them in the garage somewhere for some future owner that wishes to repair something, or add on. We may even extend this flooring down the hallway, since the carpet there is in pretty bad shape as well.
I'm taking the day off from work tomorrow, I think I'll read a book (not a home improvement book)
Before we installed any flooring tonight, we folded back the tar paper and wrote on the plywood underlayment "Joshua 24:15 As for me and my house we will serve the Lord" directly under the entryway flooring. I realized to late that I should have taken a picture.
My son was a really good helper tonight, he made sure I had boards and tools and we were finished with the "easy" stuff by about 9PM. However when I got over to the corner where the two doors are and it was the last run, it got a little interesting. I thought I had layed out the first run of flooring in the kitchen such that I would end up with 2-1/2 inches to install on the other end. I ended up with about 1/2 inch. Either we accumulated 2 inches of slack over 33 feet, or I miscalculated. Given my recent bouts with mis-calculations, I am going to go with that. I had to rip down a five inch wide board to 11/16ths or smaller in some cases. I took a picture and enhanced the contrast and color to show the very small section left, the full size plank is five inches.
At first I thought I might be able to get away without a small board at the end, but as you can see in the next picture, the quarter-round molding just doesn't cover out that far.
This shows what it will look like once it is installed. I have to wait on installing the molding, since I made a mistake on painting the gap. I used Semi-Gloss instead of a flatter paint for the wall. So I need to go back to Home Depot and ask for the same color, just in a flat paint that I can use on the walls, then install the molding. Once that's done, we can start putting on the felt pads for the different furniture, including the piano, and get our living room back in order. My wife did a great job straightening up the kitchen today, since all of the appliances were hooked up and I was out of the way with tools etc.
I intentionally bought one extra box for future needs, but I think I may have bought too much, since I had quite a few boards left over. It is hard to tell exactly how much material you are going to need since you end up cutting away excess material on the ends many times.
Now I need to wrap those boards up tight in something, as well as the box on the floor, and put them in the garage somewhere for some future owner that wishes to repair something, or add on. We may even extend this flooring down the hallway, since the carpet there is in pretty bad shape as well.
I'm taking the day off from work tomorrow, I think I'll read a book (not a home improvement book)
Tuesday, August 28, 2007
Monday Progress - 48 square feet to go!
I am almost done putting down the flooring in the living room.
My pastor called this morning and said "If you're not done, I'll come over and help. Oh, yes please!" We spent a few hours putting down whatever boards we had left, then moved the appliances back in to the kitchen.
Earlier in the day, I had double checked my measurements and ordered three more boxes (of 23 square feet each) which should arrive tomorrow some time. I hope to put those down tomorrow night and be done with the flooring installation by tomorrow night. However, as my sister kept reminding me, the project isn't done until the molding is placed around the floor. Since the new molding is significantly smaller, it will leave a lot of unpainted wall showing. So, with that in mind, I went out to the garage and found the paint can from 1999 that we used to paint the living room and took it over to Home Depot tonight to have another can made up. Hopefully it's the right stuff because I also used that paint to fix up dings and scratches on other places up the wall. The color seemed to match pretty well, but I am not sure about the gloss factor. I guess I'll find out when it is dry tomorrow night. (Edit: Well, it was the wrong gloss factor, I must have grabbed the can for the trim, not the walls. Guess I get to do some more painting tonight!)
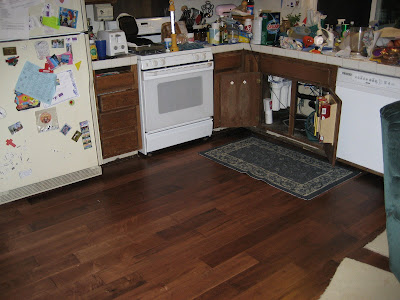
Getting the appliances back in their places should help my wife start to get the kitchen under control again. If you look at the picture above you'll see that there is a lot of stuff on the counter, it all had to come out from under the counter to put the dishwasher back in place. We also spent a little time resetting the leg heights on the stove to get it completely level, both side to side and back to front. My son asked me why this was important, I told him it was so that when we fry bacon, the grease won't all go to one side.
Tuesday is back to work day for me, so I hope that the paint drys, the boards arrive and I can get the flooring installed pretty quickly. Of course, when I get to the end near the front of the house, I can no longer use the cleat driver, but will need to pilot drill and finish nail them in place. It's also harder because I have to rip saw the boards along the last row to fit in whatever space is left. Hopefully it is exactly what we cut off Saturday morning to start the first row in the kitchen, if so I already have the other side cut (probably not)
I put a video of the cleat nailer in action if you wanted to see it.
My pastor called this morning and said "If you're not done, I'll come over and help. Oh, yes please!" We spent a few hours putting down whatever boards we had left, then moved the appliances back in to the kitchen.
Earlier in the day, I had double checked my measurements and ordered three more boxes (of 23 square feet each) which should arrive tomorrow some time. I hope to put those down tomorrow night and be done with the flooring installation by tomorrow night. However, as my sister kept reminding me, the project isn't done until the molding is placed around the floor. Since the new molding is significantly smaller, it will leave a lot of unpainted wall showing. So, with that in mind, I went out to the garage and found the paint can from 1999 that we used to paint the living room and took it over to Home Depot tonight to have another can made up. Hopefully it's the right stuff because I also used that paint to fix up dings and scratches on other places up the wall. The color seemed to match pretty well, but I am not sure about the gloss factor. I guess I'll find out when it is dry tomorrow night. (Edit: Well, it was the wrong gloss factor, I must have grabbed the can for the trim, not the walls. Guess I get to do some more painting tonight!)
Getting the appliances back in their places should help my wife start to get the kitchen under control again. If you look at the picture above you'll see that there is a lot of stuff on the counter, it all had to come out from under the counter to put the dishwasher back in place. We also spent a little time resetting the leg heights on the stove to get it completely level, both side to side and back to front. My son asked me why this was important, I told him it was so that when we fry bacon, the grease won't all go to one side.
Tuesday is back to work day for me, so I hope that the paint drys, the boards arrive and I can get the flooring installed pretty quickly. Of course, when I get to the end near the front of the house, I can no longer use the cleat driver, but will need to pilot drill and finish nail them in place. It's also harder because I have to rip saw the boards along the last row to fit in whatever space is left. Hopefully it is exactly what we cut off Saturday morning to start the first row in the kitchen, if so I already have the other side cut (probably not)
I put a video of the cleat nailer in action if you wanted to see it.
Sunday, August 26, 2007
Sunday Progress - Missed it by that much
I just couldn't go to sleep Saturday night, I just kept thinking about what we were going to do next and how long it would take to get it done. Unfortunately none of my guesses were right, not even how much material we would need.
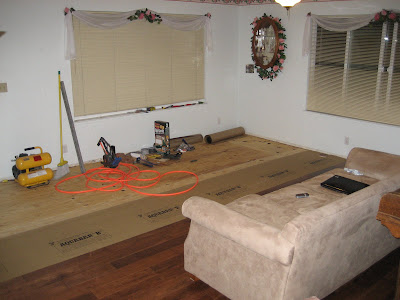
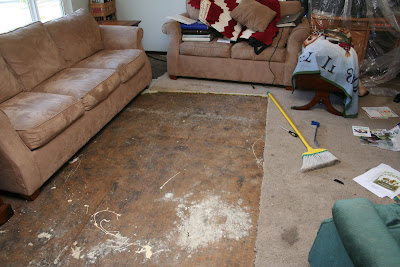
As the picture shows, we have about half of the living room still to go. I got up plenty early and ran over to Home Depot to pick up some more cleats and some more Tar paper. We didn't want to have to run over there later in the day, since we knew we didn't have enough paper, and we weren't sure if we had enough cleats.
I had decided to skip church in the morning (Yes, I know!) and work until I had to leave for the Sunday night program that I was kicking off that night. If we worked as effectively from 9 AM until 3 PM as we had done in the open area of the kitchen the day before, we'd be almost completely done before I had to leave. Then the phone rang. "I need you to come to church and do sound, so-and-so is out of town and we need you for the service" OK, now I had to leave the house at 10AM and not be back until 11:30AM.
Getting in to the living room required us to bridge the entryway and set a new chalkline for the boards in the living room. It took us quite a while to establish a new line for various reasons, so we didn't really start laying down flooring until just before I had to leave for the morning service. When I got back, we tried to get a few boards in place, but with just the two of us, we weren't moving too fast.
Later in the afternoon, two more of my friends came over and we really started moving fast. However I ran out of time before I had to leave for the sunday night program. Fortunately my sister and another friend stayed for a little while and did a few more rows.
So, sitting here on the couch in the living room I can see that we have about 7 feet 7 inches to go which (when multiplied by 18) is 136 square feet left. Unfortunately I only have 104 square feet of material left! Somewhere along the line, the guy at the store thought I had 500 square feet of flooring that I needed. Yesterday I realized that I didn't have enough plywood to cover the floor, that should have been my first clue. We didn't really scrap THAT much of the plywood, so I couldn't figure out how we had been three full sheets short. We had ordered 10% overage on the flooring, so I purchased 552 square feet. Turns out I needed about 580 to 590.
So, tomorrow I finish installing what I have, get a good measurement, and order at least two, maybe four boxes of material (to have enough variety) then rent what I need to finish the job another day this week, since it takes a few days for delivery.
Ugh, I'm frustrated right now!
Saturday Progress - Half way
I'm writing this on Sunday night since we haven't had the internet connected for 48 hours. I am going to summarize the Saturday progress and then write another post for Sunday.
The plywood installation completed Saturday morning about 11AM. We had to buy some more plywood, because we just didn't have enough. It turned out that we needed three additional 4x8 sheets of plywood, we originally had 16 making the total 19 sheets used, with a little wasted material trying to fit in special areas etc. (This will be important later, note the foreshadowing)
I uploaded a video of the plywood underlayment stapler in action.
After we completed stapling down the plywood, we put down the tar paper for a moisture barrier. Apparently it also acts to quiet the floor some as well. It is a piece of kraft paper, a layer of tar, and another piece of kraft paper. When you look at the floor in progress pictures, you'll see a greenish/brown paper laying on the plywood underlayment. It is four feet wide and we put down one line of it to start.
The most drawn out part of the day was getting the proper initial measurements to set the first line of boards. Over and over it is emphasized to not use the wall as a guide, rather find a couple of places along the wall and measure out 1/2 of one board width PLUS a 1/2 inch expansion space. In our case that makes 3 inches. However the wall is not straight, and the sliding glass door is set back a little way from the drywall. We marked a few places, then used a chalkline (had to go buy one since I hadn't asked anyone to bring one of theirs) to snap a straight line as a reference. Since the marked points are from the wavy wall, some of them are inside of the line and some of them are outside of the line. The line is the reference for all of the boards along that first row. We then had to measure the actual width that the first board needed to be. Oh man this took a long time, then we made one wrong and had to do it again. The biggest problem is remembering which edge of the board to measure from since there is a tongue on one side and a groove on the other, you can't just turn them around if you measured wrong.
Eventually we had a board cut to the right dimensions to attach it to the floor. Since the first run is usually two or three inches from the wall, the special air-powered wood floor cleat nailer was too big to get in and be used. We had to pilot drill and hammer in 1-1/2" finishing nails. The pilot drill was a nail with the head cut off. Once the first board was nailed down, we could move on to the board next to it. Again, since the wall is wavy, we had to measure again to be sure that the board would end up with about 1/2" clearance from the wall. This space gets covered by "quarter-round" molding eventually. This proceeded for what must have been an hour, maybe more. It may have taken a while, but it was important not to rush it, as any mistake there would offset the next row etc. etc. so I wanted it to be right.
Once the first row was top-nailed, we could actually start using the cleat nailer. Cleats are like a flat nail with an L shaped head. They are designed to be driven at an angle through the tongue end of the board, between the tongue and the top of the board. This holds it solidly, but can be covered up by the groove of the next board. This leaves no nails on the surface of most of the floor.

Seeing these cleat nails in a row like this reminds me of when I was a kid and my dad and I were at a parking lot with a construction site adding on to the strip mall. We looked on the ground and there was a lot of litter, and in the litter there were these strips of nails, all glued together at an angle. We figured it was trash so we grabbed a few strips and took them home. We had hundreds of these nails, apparently the guys using them just threw out partial strips when they were done for the day or something. Well let's just say, any time a project required a nail, we knew exactly where to get one!
The biggest problem with installing this flooring material is that it comes in random lengths, at least seemingly random. You can open a box and you'll have a lot of long pieces, and another box will have a lot of short pieces. We would keep three boxes open at a time to be sure to have the variety we needed in order to not end up with two seams matched up from one row to the next, within six inches. This allows the seam of one row to be held tightly by the groove of the next row being complete. This gives the floor strength, and it makes the floor have a much more random look, not repetitive like tile for instance. Finally someone had the great idea to stand it up along the wall and be able to see how long the boards were and find that there were really about seven different lengths, and knowing that you could select the boards you needed much more quickly. Since the board length didn't always add up to exactly the width of the room, we would have to cut a little off the end of one board at the end, and usually use that cut off piece to start the next row, not wasting too much material. Once we got in a pretty good pattern of putting in pieces, tapping them in place with a pounding block (discarded piece of material) and cleat nailing the main floor of the kitchen went pretty fast. Then we got to the counters.
The area under the dishwasher does not get any hardwood. Just the new plywood underlayment. This required that we drew a straight line across where the lower front of the dishwasher would end up and place our boards right on top of this line. There were other special areas, like around the stove and getting back in where the refrigerator sets.
Eventually we had to call it a night since it was 10 o'clock and we had to use a power saw.
We had made it to the entryway to the living room.
The plywood installation completed Saturday morning about 11AM. We had to buy some more plywood, because we just didn't have enough. It turned out that we needed three additional 4x8 sheets of plywood, we originally had 16 making the total 19 sheets used, with a little wasted material trying to fit in special areas etc. (This will be important later, note the foreshadowing)
I uploaded a video of the plywood underlayment stapler in action.
After we completed stapling down the plywood, we put down the tar paper for a moisture barrier. Apparently it also acts to quiet the floor some as well. It is a piece of kraft paper, a layer of tar, and another piece of kraft paper. When you look at the floor in progress pictures, you'll see a greenish/brown paper laying on the plywood underlayment. It is four feet wide and we put down one line of it to start.
The most drawn out part of the day was getting the proper initial measurements to set the first line of boards. Over and over it is emphasized to not use the wall as a guide, rather find a couple of places along the wall and measure out 1/2 of one board width PLUS a 1/2 inch expansion space. In our case that makes 3 inches. However the wall is not straight, and the sliding glass door is set back a little way from the drywall. We marked a few places, then used a chalkline (had to go buy one since I hadn't asked anyone to bring one of theirs) to snap a straight line as a reference. Since the marked points are from the wavy wall, some of them are inside of the line and some of them are outside of the line. The line is the reference for all of the boards along that first row. We then had to measure the actual width that the first board needed to be. Oh man this took a long time, then we made one wrong and had to do it again. The biggest problem is remembering which edge of the board to measure from since there is a tongue on one side and a groove on the other, you can't just turn them around if you measured wrong.
Eventually we had a board cut to the right dimensions to attach it to the floor. Since the first run is usually two or three inches from the wall, the special air-powered wood floor cleat nailer was too big to get in and be used. We had to pilot drill and hammer in 1-1/2" finishing nails. The pilot drill was a nail with the head cut off. Once the first board was nailed down, we could move on to the board next to it. Again, since the wall is wavy, we had to measure again to be sure that the board would end up with about 1/2" clearance from the wall. This space gets covered by "quarter-round" molding eventually. This proceeded for what must have been an hour, maybe more. It may have taken a while, but it was important not to rush it, as any mistake there would offset the next row etc. etc. so I wanted it to be right.
Once the first row was top-nailed, we could actually start using the cleat nailer. Cleats are like a flat nail with an L shaped head. They are designed to be driven at an angle through the tongue end of the board, between the tongue and the top of the board. This holds it solidly, but can be covered up by the groove of the next board. This leaves no nails on the surface of most of the floor.
Seeing these cleat nails in a row like this reminds me of when I was a kid and my dad and I were at a parking lot with a construction site adding on to the strip mall. We looked on the ground and there was a lot of litter, and in the litter there were these strips of nails, all glued together at an angle. We figured it was trash so we grabbed a few strips and took them home. We had hundreds of these nails, apparently the guys using them just threw out partial strips when they were done for the day or something. Well let's just say, any time a project required a nail, we knew exactly where to get one!
The biggest problem with installing this flooring material is that it comes in random lengths, at least seemingly random. You can open a box and you'll have a lot of long pieces, and another box will have a lot of short pieces. We would keep three boxes open at a time to be sure to have the variety we needed in order to not end up with two seams matched up from one row to the next, within six inches. This allows the seam of one row to be held tightly by the groove of the next row being complete. This gives the floor strength, and it makes the floor have a much more random look, not repetitive like tile for instance. Finally someone had the great idea to stand it up along the wall and be able to see how long the boards were and find that there were really about seven different lengths, and knowing that you could select the boards you needed much more quickly. Since the board length didn't always add up to exactly the width of the room, we would have to cut a little off the end of one board at the end, and usually use that cut off piece to start the next row, not wasting too much material. Once we got in a pretty good pattern of putting in pieces, tapping them in place with a pounding block (discarded piece of material) and cleat nailing the main floor of the kitchen went pretty fast. Then we got to the counters.
The area under the dishwasher does not get any hardwood. Just the new plywood underlayment. This required that we drew a straight line across where the lower front of the dishwasher would end up and place our boards right on top of this line. There were other special areas, like around the stove and getting back in where the refrigerator sets.
Eventually we had to call it a night since it was 10 o'clock and we had to use a power saw.
We had made it to the entryway to the living room.
Friday, August 24, 2007
And So it Begins
We started the weekend early, by putting down the underlayment.
The process is pretty straightforward. Starting with a full sheet of plywood lay it down in the farthest corner and then put screws at each corner, and halfway along each edge. Then take the
air powered staple gun and put staples every 12 inches along the edge and every 12 inches midst the field. I bought 2,000 staples, figuring I needed a little more than 1,000. At the end of the night, with only three sheets of plywood to go, I only have 500 left. Guess I am putting in more than enough staples.
The part that really slowed us down was getting the plywood to fit in to all of the areas that the appliances are in. We wanted to have the plywood under the dishwasher, stove and refrigerator, so we had to do some fancy cutting and pushing to get around. One piece covered both the underneath of the stove and the refrigerator, which has a small cabinet between.
After the kitchen was done, we proceeded to the living room. It's a piece of cake compared to the Kitchen, but we realized that we didn't have enough sheets of plywood left. We had used 9 sheets in the kitchen, and had only bought 16, so we certainly didn't have enough to finish. We'll need to pick some of that up in the morning.
Tomorrow, as early as I can get up, we are going go to the local Home Depot and rent the hardwood floor nailer. It is a pneumatic nailer, set at an angle, and fired by hitting it with a certain mallet. The mallet causes the board to snug up to the one next to it before the nail drives home. The unit at Home Depot actually uses something called a cleat. It is a flat nail with barbs along the bottom edge, and an L shaped top. Apparently this is now the "best" way to install floors. Fortunately they have a lot in stock (well at least at 7PM tonight) hopefully they will still have some at 7AM tomorrow.
Gotta get some sleep and get back at it in the morning. My sister flew in tonight, and another friend is coming to help and is bringing his chop saw over to cut the ends square.
The most important part of the day is getting the flooring started square, so it may take us a little while to get it all right before we nail anything down. Hopefully by 10AM we will be laying flooring at a good rate. Check back tomorrow night!
Wednesday, August 22, 2007
Moving some wiring
I have a number of wires that I have added to the house over the years. Phone line in the living room, another phone line (Home Run) for the DSL modem, a couple of ethernet wires, Coax cable for the TVs etc. etc.
Unfortunately I wasn't good and did a wonderful job putting them in the wall, no I just drilled holes in the old flooring and sub-floor and ran them under the house. Now, I'm not the first to do this, the cable TV was installed this way, so don't blame me for coming up with a bad idea. The reason it is a bad idea is that now these wires are going to have to move in to the wall or be re-drilled in the new flooring. Well, I figure I can get the wires in the wall now instead of wiring them through the flooring on Saturday when we need to be getting the flooring looking good and not worrying about 1/4" obstacles.
I borrowed a really nice three foot long drill bit, specifically made for this exact purpose, however it was useless to me since I wasn't planning on crawling under the house. You know that old saying "necessity is the mother of invention?" I really don't want to crawl under the house to fix the wiring, so I devised a cunning plan. Drill a 1" hole through the drywall and through the 2x4 at the bottom of the wall close to where the existing wires come through. Reach through this new opening and grab the wire from under the house and pull it through. Sounds easy huh? Well, that was three hours ago, and I just finished the two phone wires and the two ethernet wires. I still have to two different coax TV wires to do. Not tonight!
Of course, that's just the living room, the kitchen has similar "wiring." The two ethernet wires in the living room come up through the floor in the kitchen to run a computer in there, that'll have to be done. There is also a water hose for the icemaker that will have to be run up through the wall. I'm not sure this method will work with that since you don't really grab just one end of the wire, you actually hook it and pull two pieces of wire through the opening. I don't think the water line will bend like that. Guess I'll have to think of something else.
Tuesday, August 21, 2007
Screwin' down the hatches
Didn't get much done tonight, other than trying to tighten up some of the squeaks in the living room. I called my contractor friend and he suggested instead of crawling under the house to tighten up the extra supports under a section of the living room, I could start by putting screws through the 1-1/8th inch plywood from above and tighten it up a lot. Over ten years ago I had this same contractor put some extra support under the plywood since it spans such a great distance between floor joists, four feet. This extra support is in the form of 2x6 boards nailed in to place under the plywood on top of joist hangers. It is my suspicion that these nails are slightly loose causing them to squeak when you walk over that area of the floor. Since I didn't have exact measurements to find these extra support beams, I had to start drilling. I drilled about ten holes in the floor until I didn't feel the bit break all the way through. I then started drilling along the board to make pilot holes for the screws. Well, adding screws got rid of most of the squeak, but there is still a noticeable squeak in that area, so I still have to go under there and try to find whatever is squeaking and tighten it up, at least this way, if I have to put that part off, at least I know I have done what I can from above, it is as tight as it is going to get from that side.
Monday, August 20, 2007
Patching Things Up
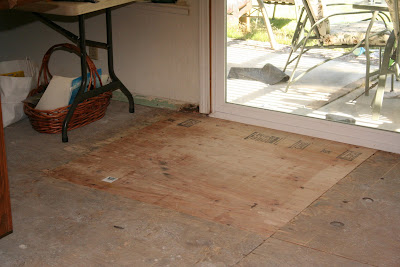
It may not look like much, but I patched up the water damaged area by the back door.
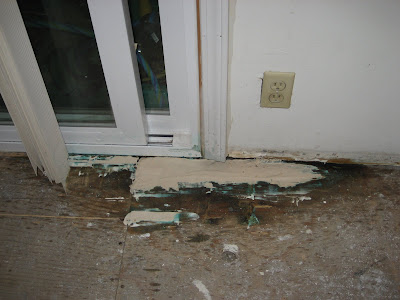
This area had some water damage that caused the top two layers of the plywood to be rotted and easily pried out with a screwdriver. Yesterday I scraped out as much of the rotted wood, exposing fresh good wood. I then applied a lot of copper green and let it dry for a day. I mixed some "Fix-It-All" with a lot of water and poured it in to the area that was scraped out. I used a trowel to level it out and let it dry. A few hours later it is pretty hard, by this weekend it should be completely solid and able to support the flooring.
I also mixed some of the same "Fix-It-All" with a lot less water and patched up the drywall on the other side of the sliding glass door.
Saturday, August 18, 2007
New Flooring has arrived
We picked up the new flooring and the underlayment today.
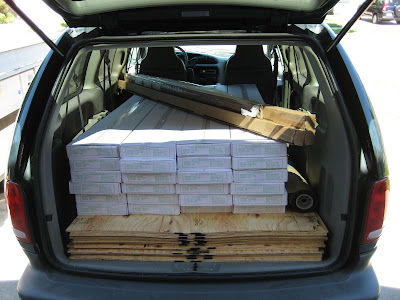
The white boxes are filled with four layers of wood, face to face and protected with plastic and foam.
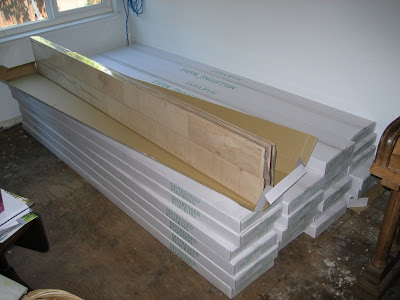
We started to open up the boxes in order to allow the wood to acclimate to the weather in our house, but after we opened up one of the boxes I read on the instructions "Do not open boxes of wood until ready for installation." Great now I have a conflict of information. I need to call the flooring store on Monday and verify which instructions I should follow.
After getting the flooring in the house, I did a little squeak hunting. There are two primary squeaks in the floor, one in the kitchen and one in the living room. In the kitchen I isolated which edge of sub-floor, and nailed all of the nails back down really tight with a sledge hammer and the squeak went away. I went in the living room and tried the same, no luck. I screwed in some more screws, no luck. I pried out the old nails, no luck. I then remembered that I a contractor put some extra support under that area, since the entertainment center used to sit there, and now the piano sits there, and it is what is actually squeaking UNDER the floor. I'll crawl under there one of these days and fix it, but for now I just cleaned up after myself and called it a day.
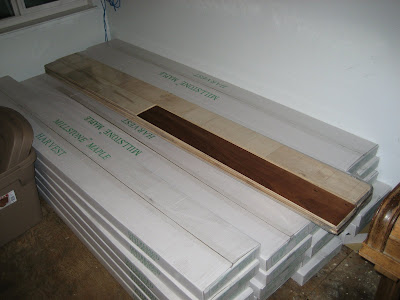
I really wanted to look inside the stack, so I took one piece out to look at it.
The white boxes are filled with four layers of wood, face to face and protected with plastic and foam.
We started to open up the boxes in order to allow the wood to acclimate to the weather in our house, but after we opened up one of the boxes I read on the instructions "Do not open boxes of wood until ready for installation." Great now I have a conflict of information. I need to call the flooring store on Monday and verify which instructions I should follow.
After getting the flooring in the house, I did a little squeak hunting. There are two primary squeaks in the floor, one in the kitchen and one in the living room. In the kitchen I isolated which edge of sub-floor, and nailed all of the nails back down really tight with a sledge hammer and the squeak went away. I went in the living room and tried the same, no luck. I screwed in some more screws, no luck. I pried out the old nails, no luck. I then remembered that I a contractor put some extra support under that area, since the entertainment center used to sit there, and now the piano sits there, and it is what is actually squeaking UNDER the floor. I'll crawl under there one of these days and fix it, but for now I just cleaned up after myself and called it a day.
I really wanted to look inside the stack, so I took one piece out to look at it.
Demolition Complete (no, really)
My friend came over this morning and we pulled out the Island and the flooring under it.
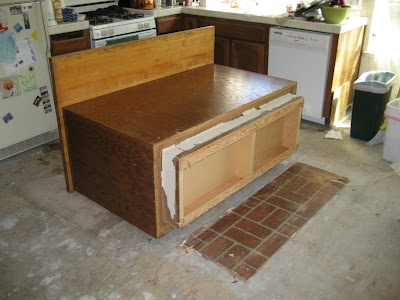
It really didn't take that long, since the nails that held the island in place weren't really catching the wood underneath very well. I think it was really being held in place by the linoleum that was coved up around it on all four sides and glued in place. We'll need a better support method when we just have the small quarter-round molding.
It really didn't take that long, since the nails that held the island in place weren't really catching the wood underneath very well. I think it was really being held in place by the linoleum that was coved up around it on all four sides and glued in place. We'll need a better support method when we just have the small quarter-round molding.
Friday, August 17, 2007
De-Carpeting Done!
We moved the piano off the last few square feet of carpet in the living room last night, and pulled it up. I set aside that piece for setting furniture or tools on when we are doing the install. I also went out to the carpet pile on the side of the house and picked through looking for some good segments, mostly those that still looked good and had obviously not been walked on or spilled on over the last 14 years.
We took the rest of the carpet, matting and molding to the friendly dumpster again, so I don't have a big pile of junk to deal with later.
Tomorrow my friend comes over to help pull up the island and the flooring underneath. I plan on setting the island out of the way so we can start the flooring and then put it over the new flooring (with carpet scrap underneath) temporarily while we continue flooring. I can then go back and put the island back down where it belongs. I am going to get some advice on the best way to put it back on the new flooring with the minimum damage in case some future owner wants to pull out the island do something different in that spot.
Wednesday, August 15, 2007
Full Desk, Clean Desk, No Desk, Floor
Well, we no longer have a big desk in our living room.

We spent the day cleaning out the desk, it looks messy because we pulled everything out of its place so we could put it in boxes and in to the garage.
My wife helped me take the desk apart and put the pieces in the garage. We still don't have a way to get rid of it, but we know it's not coming back in.
I got a call from the flooring store, and the materials are already in! I need to get that material here so I can start getting the plywood underlayment in place.
Tuesday, August 14, 2007
Clean up the desk!
If you have ever seen the BIG desk in the living room, you'd know that it is going to need a lot of preparation time to get it out of the way to take up the carpet underneath and
put in the new floor.
In addition to filing cabinets etc. etc. the desk was the host to:
2 Printers
1 computer with LCD monitor
DSL Network and wireless
1 TV
1 VCR
1 DVD
In order to not "shut down" all of the electronics in my house, I had to relocate all of those items in to a previously flooring removed area. So, we set up a card table for the printers, network and computer, and used one of the end tables to host the TV and DVD player.
Boy, am I loooking forward to this project being done!
Monday, August 13, 2007
Flooring Materials Ordered
Well, I actually spent some serious cash on this project today. Let's just say I called to make sure my Disney card credit limit was high enough, we'll be enjoying those "free" Disney dollars in a few weeks at Disneyland after we get the floor put in. Even though we thought the color of the Dark-Brown / Yellow matched our piano and existing cabinets better, we went with the lighter color reddish stain instead. When I showed my wife a few pictures it became clear how much darker one was than the other. So, I have made my bed, now I must lie in it. I have to say, the guy at the flooring store gave me absolutely no comfort when I said "I'm still not sure if this is the right color" he just gave me that look like "What, am I supposed to be a mind reader and tell you what to do?" I finally said, yes, this is the one I want. The color is supposed to be "Harvest."

I went ahead and ordered the 3/8" plywood underlayment from them and all of the molding etc. so I should have all of the material on site well ahead of our scheduled installation day. My friend is coming next Saturday to help pull the island off the floor and remove the remaining tile/linoleum from underneath. Since putting down the plywood is not as precise a process as putting down the actual flooring, I am going to try to get some of that installed before the day we want to put the flooring in, that way the only thing we have to do is take our time and do the hardwood right.
I went ahead and ordered the 3/8" plywood underlayment from them and all of the molding etc. so I should have all of the material on site well ahead of our scheduled installation day. My friend is coming next Saturday to help pull the island off the floor and remove the remaining tile/linoleum from underneath. Since putting down the plywood is not as precise a process as putting down the actual flooring, I am going to try to get some of that installed before the day we want to put the flooring in, that way the only thing we have to do is take our time and do the hardwood right.
Sunday, August 12, 2007
De-Carpeting Continues
Tonight we pulled out another 100 square feet or so of carpet and matting.
The kids continue to do a fabulous job helping me with this project. My son has excellent staple removal technique and my daughter is great with a broom and dustpan.
All that remains to be removed from the living room floor is the carpet under the Piano and Desk. Moving the Piano isn't that big of a deal, we just have to clean up the knick-knacks on the top and move it out on the plywood. Moving the desk on the other hand is much more involved.
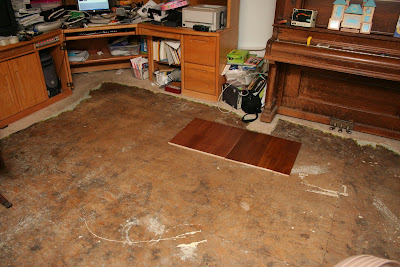
I am going to take the next couple of days off to order materials and make a good plan in order to be sure that everything is ready for Floorsday. We still aren't 100 percent sure which color we are going to go with, as you can see in the picture above, I am still trying to see what each of the colors look like in this environment. The underlying question is simply, are we trying to match it to something we have, or trying to set a foundation for a future color scheme. I am leaning towards the latter, so we want to be sure whatever we pick will work well with whatever paint colors and cabinet/counter top materials my wife wants to use in the kitchen. I have to decide on Monday so I can get it ordered and here in time to put it in.
The kids continue to do a fabulous job helping me with this project. My son has excellent staple removal technique and my daughter is great with a broom and dustpan.
All that remains to be removed from the living room floor is the carpet under the Piano and Desk. Moving the Piano isn't that big of a deal, we just have to clean up the knick-knacks on the top and move it out on the plywood. Moving the desk on the other hand is much more involved.
I am going to take the next couple of days off to order materials and make a good plan in order to be sure that everything is ready for Floorsday. We still aren't 100 percent sure which color we are going to go with, as you can see in the picture above, I am still trying to see what each of the colors look like in this environment. The underlying question is simply, are we trying to match it to something we have, or trying to set a foundation for a future color scheme. I am leaning towards the latter, so we want to be sure whatever we pick will work well with whatever paint colors and cabinet/counter top materials my wife wants to use in the kitchen. I have to decide on Monday so I can get it ordered and here in time to put it in.
Saturday, August 11, 2007
Choose Wisely
The clock has started to tick on putting flooring back down. My sister set in motion the eventuality that I started weeks ago, August 25th is floor installation day. The sub-floor will be ready, but what are we going to put on it?
We have been hemming and hawing over Hardwood, Engineered Hardwood, Laminate or Vinyl/Linoleum. There are many good reasons to go with each of these types of floor. We are not considering ceramic tile, primarily because the thought of dropping a cup and shattering it is not appealing, but also because the extra weight would require a lot of strengthening to be added to the sub-floor.
We also want to use the same material in the kitchen as the living room as one room is closely tied to the other. There is a six foot opening between the living room leading in to the kitchen. We think it makes sense for both of these rooms to have the same look, so the flooring should be the same.
Since we don't want linoleum in the living room, we don't want to put it in the kitchen, although of course we could easily divide it at the opening, my wife doesn't really care for it in general.
So we are down to using some form of wood. Laminate flooring is significantly less expensive, and can be significantly easier to install. But cost and ease of installation are not my primary motivation. Long lasting material, good appearance and eventual benefit to selling price are more motivating to me.
So we are going to use hardwood, or engineered hardwood. Hardwood is usually sold in three inch wide strips and are individually nailed down. Engineered Hardwood is actually a quarter-inch (or much less as we found out today) veneer of hardwood on top of three to five-eighths of plywood. These strips are sold in three or five inch widths, and can be nailed, stapled, glued or "floated." Ah! Even more choices!
We went to a flooring store today called "Lumber Liquidators" if you are looking for inexpensive flooring, boy do they have it, but it is cheap! The veneer is only a very thin layer on the top, too thin for my liking.
We eventually ended our day at the place my contractor friend recommended and they had some material we had seen before, but at a lower price. The man working there was also very helpful filling in information no one had given me before and really offering to help me as a do-it-yourselfer. He offered to send home some samples with us, and if I brought back the layout, he would make out material list we needed for all of the molding, edging with the carpet etc. etc. I really felt like he wanted to help me. We took home his samples and this is what they look like in our house under natural light coming in through the front windows.
These are both the same material, "hand scraped" maple, one is stained with a darker brown with yellow tinge, the other is a little lighter stain with a red tinge. You can see closeups of each under direct flash light in the photo album.
"Hand scraped" hardwoods have intentional defects in the surface such that when future defects are added by us, they won't be so noticeable.
We are pretty sure we like this brand and price, we just have to choose the color. The installation process is pretty straightforward. First put down 3/8" plywood underlayment and staple it in place. Second put down Kraft paper, for a little fill between the boards. Third put the flooring down and staple it in place.
Should be great when it's done. In two weeks!
Let the De-Carpeting Begin!
Today we started cutting out the carpet in the living room. It is SOOOO much easier to take out Carpet and matting than particle board and linoleum. If taking out particle board and linoleum is
like pulling out a tree stump, then taking out carpet and matting is like pulling a mushroom out of moist manure. Yeah, it's a lot easier (OK, it doesn't stink so the analogy is not that great). We removed about 125 square feet in about an hour this morning, that would have easily taken five times longer in the kitchen.
The process is relatively simple, pull the carpet away from the tack strips along the edge, cut the carpet in to large squares, from underneath, cut the mat and then pull out a few staples. These staples are not like the ones in the kitchen, they are only about 1/2" deep, copper and are pretty easy to get out with a screwdriver or the prybar. My son actually got a pretty good technique going to force out the staples without too much trouble. The most difficult part is moving the furniture around to get to the carpet, we have a lot of stuff in the way.
The next big job in the living room is moving the big desk and piano away from their present spots and pulling up the carpet underneath. Since we recently purchased a roll top desk from a garage sale, in excellent condition, we are going to get rid of our big desk and use the roll top as an actual desk, and do something else for the desktop computer. Since most people in our family have a laptop, the desktop isn't used as much as it used to be. Also, since we no longer need a deep corner for a glass CRT type monitor, since LCD's are smaller and lighter, we just don't need it to take up as much space. So, we are going to try to find a good home for that desk at the same time we are pulling up the carpet. We still aren't sure what we are going to do.
Thursday, August 9, 2007
Dumping my trash
We loaded up the trunk of the van to dump it today and it is amazing how something that looks so flat ends up taking up so much room in the van.
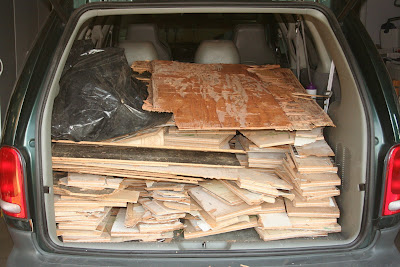
We were able to find a friendly dumpster that we could use to get rid of this trash.
I returned the unused portion of the flooring plywood to the man who said I could use as much as I wanted, but to bring back the left overs. While talking with him I realized that I need to go ahead and dismount the island from the kitchen floor and remove the flooring underneath and get rid of it as well. Then we can put a whole floor in and put the island back on top, if some future homeowners want to move the island, or put something different in, they will just have to undo whatever holds it down and clean up the holes that are left behind. They won't have to relay flooring etc. Of course, this future homeowner could be me, so I better do what's best now. The only "problem" is that there is an electrical feed for the outlet on the island, so we have to be careful moving it around, or figure out a way to store the wire under the floor until we need it, maybe tie a string to it and nail it in place or something. So, just like the Doomsday clock, I am resetting the percentage of floor demolition back to 95% until I can get the rest of the flooring up.
I am not sure when I will get to this, but I do need to take some time off from work before things get really crazy for some new product design we are doing.
Tuesday, August 7, 2007
From Demo to Remo
I did my last kitchen floor Demo(lition) today, and started my first Remo(deling), in a sense, today.
I took the day off from work today to do a complete removal of the old rotted plywood and get a new piece in its place. It wasn't as simple as it sounded.
First I had to remove all of the external stucco that was aligned with the piece of plywood to be taken out.
It didn't really take that long to bust out the stucco using a mason's chisel. I used a borrowed "sawzall" to cut the nails under the sliding glass door frame holding the old plywood in place. Once those were cut, it was pretty easy to pull out the rest of the rotted plywood. I spent a lot of time cleaning out other pieces of wood that were also rotted. I probably could have spent another whole day cleaning out bad wood and replacing it, but there comes a point in a project where you just have to stop. Fortunately my contractor friend had given me more than enough copper green for the other water damage, that I could soak these newly found water damaged parts.
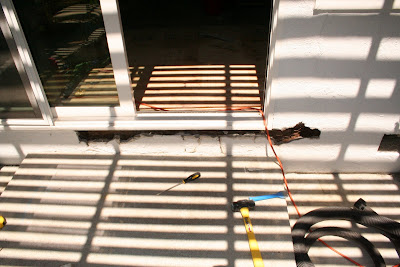
After I cleaned out all of the wood, stucco and caulking there was daylight coming through from under the door frame where the plywood used to be.
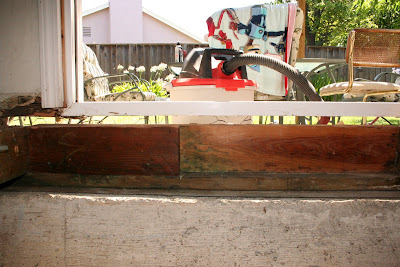
As much work as that seemed, that was the easy part! The primary reason that I busted out the stucco was to be able to make it easy to put in the new piece of plywood. Since the plywood is tongue and groove, I actually had to get the plywood all the way in and past the tongue of the existing floor, then slide it back to engage the tongue of the new piece. The tongue is about one inch long, so I had to go at least that much past where the piece would end up, then slide it back. Slide isn't exactly the right word, sledge hammer, grunt, groan, moan is probably a better word.
If you look at the picture from inside to outside you can see that not only does the plywood have to fit under the door frame, it has to fit under the wall on the left (from inside) the door frame is flexible plastic, the wall isn't flexible. I had cut the piece of wood width wise to fit just fine, but when it came time to put it under the door, the inflexible wall wasn't as forgiving, and since the wall had settled a little, there wasn't 1-1/8th inch, there was more like 7/8ths. Well, there was nothing more to do than force it!
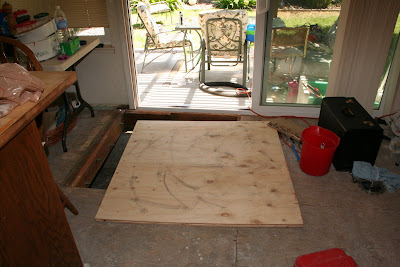
I got out the construction adhesive that was recommeded and put a bead all around the opening and on the wood under the door that would be hold up the new piece of plywood. I put white caulking on the top of the plywood and the underside of the door where I knew they would meet up. I put the plywood in the opening and had a long way to go, I was about three inches from where I needed to be. The problem was that the plywood had a slight bow to it and it caught the support wood from underneath on the left AND the right. Without a helper to pry the wood up while I hammered it, I was getting worried. I looked around and found my son's old toy dump truck, it was just the right weight to hold down the prybar on one side as I hammered in a screwdriver to act as a guide on the other side. Now I could go back in the house and use a piece of wood and a sledge hammer as a driving block and start forcing the plywood in to place. There was no turning back, the construction adhesive and the caulk were starting to set up. I hammered it until the groove went past the tongue and the whole piece of plywood dropped nicely in to place. Now I had to slide it back one inch to engage the groove of the new piece over the tongue of the existing floor. Again, having busted out the stucco was the only way to get to the plywood and pound it back in to place using that same piece of wood block and a sledge hammer. Once it was engaged enough, I could put in some screws. It had been recommended to pre-drill the screw holes so that I wouldn't have trouble putting in the screws. I had chosen the wrong drill bit and ended up making the one drill hole so big that the screw didn't even engage the wood, it just dropped right in to the hole I made. Fortunately I hadn't drilled too many holes or I would have had a problem. I chose two sizes smaller drill bit and it seemed to work OK. I ended up putting about 12 screws back in place, basically mirroring the nails that were holding in the adjacent pieces of plywood.
Now I just have to run a bead of caulk along the top of the plywood outside under the door frame, then replace the stucco. I'm going to do that another day :)
I took the day off from work today to do a complete removal of the old rotted plywood and get a new piece in its place. It wasn't as simple as it sounded.
First I had to remove all of the external stucco that was aligned with the piece of plywood to be taken out.
It didn't really take that long to bust out the stucco using a mason's chisel. I used a borrowed "sawzall" to cut the nails under the sliding glass door frame holding the old plywood in place. Once those were cut, it was pretty easy to pull out the rest of the rotted plywood. I spent a lot of time cleaning out other pieces of wood that were also rotted. I probably could have spent another whole day cleaning out bad wood and replacing it, but there comes a point in a project where you just have to stop. Fortunately my contractor friend had given me more than enough copper green for the other water damage, that I could soak these newly found water damaged parts.
After I cleaned out all of the wood, stucco and caulking there was daylight coming through from under the door frame where the plywood used to be.
As much work as that seemed, that was the easy part! The primary reason that I busted out the stucco was to be able to make it easy to put in the new piece of plywood. Since the plywood is tongue and groove, I actually had to get the plywood all the way in and past the tongue of the existing floor, then slide it back to engage the tongue of the new piece. The tongue is about one inch long, so I had to go at least that much past where the piece would end up, then slide it back. Slide isn't exactly the right word, sledge hammer, grunt, groan, moan is probably a better word.
If you look at the picture from inside to outside you can see that not only does the plywood have to fit under the door frame, it has to fit under the wall on the left (from inside) the door frame is flexible plastic, the wall isn't flexible. I had cut the piece of wood width wise to fit just fine, but when it came time to put it under the door, the inflexible wall wasn't as forgiving, and since the wall had settled a little, there wasn't 1-1/8th inch, there was more like 7/8ths. Well, there was nothing more to do than force it!
I got out the construction adhesive that was recommeded and put a bead all around the opening and on the wood under the door that would be hold up the new piece of plywood. I put white caulking on the top of the plywood and the underside of the door where I knew they would meet up. I put the plywood in the opening and had a long way to go, I was about three inches from where I needed to be. The problem was that the plywood had a slight bow to it and it caught the support wood from underneath on the left AND the right. Without a helper to pry the wood up while I hammered it, I was getting worried. I looked around and found my son's old toy dump truck, it was just the right weight to hold down the prybar on one side as I hammered in a screwdriver to act as a guide on the other side. Now I could go back in the house and use a piece of wood and a sledge hammer as a driving block and start forcing the plywood in to place. There was no turning back, the construction adhesive and the caulk were starting to set up. I hammered it until the groove went past the tongue and the whole piece of plywood dropped nicely in to place. Now I had to slide it back one inch to engage the groove of the new piece over the tongue of the existing floor. Again, having busted out the stucco was the only way to get to the plywood and pound it back in to place using that same piece of wood block and a sledge hammer. Once it was engaged enough, I could put in some screws. It had been recommended to pre-drill the screw holes so that I wouldn't have trouble putting in the screws. I had chosen the wrong drill bit and ended up making the one drill hole so big that the screw didn't even engage the wood, it just dropped right in to the hole I made. Fortunately I hadn't drilled too many holes or I would have had a problem. I chose two sizes smaller drill bit and it seemed to work OK. I ended up putting about 12 screws back in place, basically mirroring the nails that were holding in the adjacent pieces of plywood.
Now I just have to run a bead of caulk along the top of the plywood outside under the door frame, then replace the stucco. I'm going to do that another day :)
Thursday, August 2, 2007
The other side of the Stucco
I had a few minutes tonight to bust out some of the stucco and verify that I could actually get to the plywood from the outside of the house.
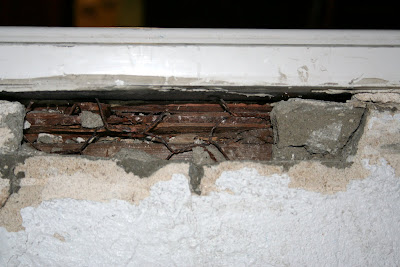
As you can see, I just have to chip out a little stucco, then bend the chicken wire out of the way and I can get to the "outside of the house" side of the bad plywood. It seems pretty obvious that if the plywood isn't properly sealed and maybe even some sort of flashing put on it, the water that gets under the sliding glass door makes it right in to this piece of plywood.
Hopefully I can sneak in some more time to bust out more stucco and get ready to be 100 percent done with demolition. When it is all cleared out, I should be able to see pretty clearly how to put the new plywood back in.
Wednesday, August 1, 2007
The Pause That Refreshes
I had my contractor friend from church come over and look at the remaining problem. I had explained that I had a serious problem that I needed his help with. His first word when he looked at it "cake." Oh, not that bad, huh? No, you can take that out and clean it all up and be just fine.
The biggest thing I was concerned about was fitting a new grooved piece on to the existing tongue from the rest of the floor. Once again his experience outweighed my guessing :) He told me that I can cut the lower half of the groove off and set the new piece on top of the old piece. If I have to do that I can always place a piece of 2x6 under where the two pieces of flooring meet and support it on either end at the floor joists.
He also told me that most contractors would say "you gotta take that door out" in order to do a good job and get all the bad wood out. He told me that if I am patient and am willing to chip away the outside stucco I can do a really good job and slide a new piece of wood back in there and make it as good as new.
Well that'll have to wait until next week, there's a lot going on the next four nights, so I have to wait until at least next Monday before I can dig in and finish up the demolition.
Subscribe to:
Posts (Atom)