Tuesday, July 31, 2007

Knee Deep in Bad Plywood

After taking a couple of days off, I got back to demolition in the kitchen tonight. After I tore out the bad plywood by the back door, I was literally Knee Deep in Bad Plywood.


I am standing on the dirt below the house in this picture with a big pile of plywood dust at my feet. I had started by pulling out the nails along the joists on either side and just peeling up layers of plywood. You can see them sitting in the backyard in this earlier picture.


Right after this picture was taken, I just stood right on the remaining quarter-inch of plywood and it just bent down under the house. I had to use a jig saw to cut out that piece so it wouldn't rip itself out from under the sliding glass door. I realized at this point that I have to rip out the plywood from under the door, but couldn't do it tonight without any support to put back in. I am going to need my contractor friend from church to come over and give me some more sage advice about what to do in this instance. I really don't want to pull the whole sliding glass door out of the stucco just to fix the wood that it is sitting on. I can see that one piece of 2x6 (I think) was added to support the wood under the door, maybe I can rip that out and put a piece all the way up to the door and have the plywood sit on it. I was given a piece of tongue and groove 1-1/8th inch sub-floor by a friend from church tonight. He just happened to have most of a sheet left over after doing some repair work of his own. I am hoping that I can use the existing tongue from the good plywood away from the door and engage the new sheet really well in the floor. This will prevent it from flexing and/or squeaking. Although it might be more important to get the sheet to slide all the way under the door. Perhaps I can undo the nails holding down the other sheet and bend it up to engage the groove on the new sheet.

All that to say, I need professional help, contractorally speaking.

For the short term, I have just covered up the hole with the new piece of plywood and it is plenty strong and wide enough to walk on to get in and out of the backyard.

Saturday, July 28, 2007

Nearly done ripping out kitchen floor

Well, I've taken out all of the kitchen flooring but I think there's more to rip out.

My friend that came over yesterday came back for a few hours this morning and we made some great progress. I only needed a few more hours to completely remove all of the flooring from the kitchen and get it outside. The far corner of the Kitchen was the last part to be finished, and now it's all done too.


As part of tearing out the floor in front of the sliding glass door I came across a new section of plywood. At first I was thinking "Wow, new Plywood!" then I realized that not only was it done to fix previous water damage, it too was completely ruined by water damage. So now I have a four to five foot square section that needs to be replaced.


The biggest problem left is getting rid of all of the trash


As you can see there are quite a few stacks of squares left to throw away. Each of those squares is about thirteen inches on a side. They weigh about four pounds each, so I can only put ten of them in a trash bag and still match the forty pound limit. So I have to throw as many of them in the trash can as I can, and put some more of them in bags at the street. We used up all of the extra garbage tags we've had for years, now we have to find out how much they charge for them. I had put some garbage bags out at the street last night. Today I went out to put another bag out there and someone had torn a hole in the bag to see what was inside. I'm guessing that it was someone looking for recyclables, but they could have just as easily untied the top and looked inside.

We're going to spend the next few days reorganizing the kitchen and getting our lives back in order. Next week we start attacking the living room. That requires removing carpeting, which should be significantly easier, of course, nothing is easy.

Friday, July 27, 2007

What Lies Beneath

Today a good friend came over in the afternoon and spent five hours working with me on the floor in the kitchen. We made a point of moving all of the furniture and appliances off of the remaining flooring. The flooring under the stove was in relatively good shape, and we could see the original white flooring with black pattern. The flooring under the refrigerator had a little water damage, but not that bad. The flooring under the dishwasher was completely ruined by water damage. It didn't seem wet at that time, but had obviously been exposed to some serious water over time. The particle board didn't come up in big pieces like it had in other places, it came up in little one inch pieces, the spacing between the staples. We discovered that the cabinets were obviously put in after the particle board, but since it was ruined in the dishwasher cavity we had to remove some under the edge of the cabinet. My son found a good long piece from another area in the floor and we put it under that spot so that the edge of the cabinet wouldn't be completely free floating. If you look closely you can see the white board to the right of the dishwasher in this picture.


After getting all of the flooring up from under the fridge, stove and dishwasher, we broke out the saw to begin taking out the final segments of the floor. I had hoped to use one of the "demo" blades that my contractor friend had given me. However I found out that professional saws have a different hole pattern in the middle than common man saws like mine. Fortunately I hadn't taken back the $5.00 saw blade I had left, so I put it on. The saw worked pretty well until I had cut about thirty feet of flooring. I think I caught a particularly bad stretch of nails and literally broke off all but one of the carbide tips from the saw blade. I had to go back to an old saw blade to complete the saw work, while it wasn't as effective as a new blade I was able to finish the sawing today.


While I had hoped to be completely done with the floor today, the last thing we were able to do before Dinner was to remove two of the four sides worth of coving around the butcher block island. To my chagrin, I discovered that the island is actually sitting on top the second layer of linoleum.


Yes, the attractive brick level :) So, it's not as clear cut to remove this flooring as I had to break through the particle board right at the edge, or just inside of, the island.

Tomorrow should be the last day of flooring removal in the kitchen. We'll see if that true :)

Thursday, July 26, 2007

Contractorly Approved

I spent a few hours on Wednesday morning sawing some more of the Kitchen floor. I cut about fifty square feet, then spent some time cleaning up the saw dust before heading to work for the rest of the day.

Last night I went over to the house of a Contractor friend from Church. He was the one that originally turned me on to the idea of doing this myself. He'd been house bound for a while so I thought we'd sit around and chat about my progress. Nope, he grabbed his crutches and wanted to see my progress in person.

He told me that I needed to scrape up as much of the water damaged wood and put "copper green" on the area to prevent bug damage, and to water protect it in the future. He gave me some fix-it-all to fill in the wood that is removed so I have a flat surface after I'm done. He also offered to give me some of his used saw blades, so I wouldn't have to pay for any more. I'll try those out on Friday when I do some more sawing. He told me that I was doing a great job and am keeping it really clean as I go.

I spent Thursday night ripping out the flooring I cut out Wednesday morning.


As I got close to the Dishwasher I found out that there has definitely been some leaking going on under there. I am pretty sure that the particle board and plywood are completely dry, but it will need to be treated properly too.


Tomorrow afternoon another friend is coming over to help me move appliances and cabinets off of the remaining flooring so I can cut it and remove as much as possible.

Tuesday, July 24, 2007

Demolition Progress Continues

After a few days off for church and a visit to Arizona for a day, I was back to demolition today. I took the morning off from work so I get some progress done. I needed to saw some more flooring up, so I cut three rows by I don't know how many across. Nearing the end of the sawing, it was getting really hard to get the saw to cut, so I bought some new blades later at night for use with tomorrow's sawing.

After lunch my wife and I finally got back to looking at new flooring. We stopped by one flooring store that had a lot of brands and the salesman was very helpful.


Engineered hardwood is our most likely choice. We learned today that installing this material requires a little more preparation and effort than most laminate flooring. This is primarily due to
the way they interlock and how easy it is to repair the floor. I am still trying to decide exactly what type of floor to put down, but was put to ease when the salesman said that the turn around time when ordering flooring is about four days. This will allow us to be almost completely done with the demolition before having to make up our minds. I was thinking that it could require three or more weeks, and that would require us to decide right now.

After thinking about it for a while my wife isn't so sure she likes the color of the above sample, but does like the appearance of the material in the lower right. From at least one company, the material comes in two forms "Engineered Longstrip" which is an eight foot long strip with a fixed width and many pieces of wood being combined together to make the top surface. The alternative is "Engineered Plank" where the tope surface is one solid piece of wood. The one in the lower right, which we like, is the "Engineered Plank."

After going to work for a little while and coming back home for a little dinner my son and I ripped out a few more squares of flooring.

I am trying to get as much of the "open" floor done before Friday so that when my friend comes to help me, we can move some of the furniture in the kitchen and work under it (like the refrigerator)

Saturday, July 21, 2007

Manifest Destiny

Another day at demolition, and there is plywood showing from the front door to the back door. If you don't know the reference to Manifest Destiny, it was that the people of the time thought we should expand the United States from Sea to Shining Sea. We had a choice to make today, do we continue towards that back door or take a left and work along the cabinets? It was pretty easy to choose to work towards the back door since we only had to move one filing cabinet and pick up a lot of school work and toys on the ground. That's a lot easier than moving the refrigerator and working along a long edge of coving.

I woke up this morning to the sound of someone not happy with my choice to not cover the kitchen food preparation areas before sawing last night. I'm not going to say that no one warned me, in fact my coworker made a pretty good case for tarping off as much as possible. There is a saying I have for pressure washing, "it removes the dirt on the ground or wall, and places it all over you" the corollary for circular saws on particle board is that it "takes the wood that used to be all in one piece and blows it in to a million little pieces every where else." So after I mowed the lawn, I headed off to the hardware store and bought cheap drop cloths.


By the time we had finished putting up the drop cloths I was already tired, but we started sawing and prying anyway. I looked at the time stamps on the pictures and it took me about 3 hours to completely remove and clean up fifty square feet. If I had to pay someone to install the floor at $2.50 per square foot that part would have cost me $125 to have removed and replaced. I'm still not sure it's worth it to do it yourself.


One area of concern showed up as we got to the corner of the sliding glass door. There is obvious water damage here, and it was on all layers of the wood and linoleum. While it was completely dry, this concerns me because I am not sure it happened before the new dual pane sliding glass door was installed a few years ago. There could be a serious problem, so we'll have to find a way to check if the leak still exists. I'm guessing it will be like when I had to try out my new rain coat I had just bought in the middle of the summer. Just put it on and have your sister hose you down in the front yard. I hope no one drives up and sees me watering the back door and think there's something wrong with me :)

Friday, July 20, 2007

Read between the tiles

Tonight I started in on the floor in the kitchen. Instead of trying to separate the linoleum from the particle board sub-floor, the goal tonight was to cut through the two layers of sub-floor and three layers of linoleum, and lift up the whole assembly as one piece.


I had replaced the old dull circular saw blade with a new, carbide tipped blade and it made pretty easy work of the particle board and linoleum. Setting the height of the blade was also pretty easy because the plywood was exposed from the living room hallway. I started by cutting along the lines of the linoleum, two squares at a time. It was pretty easy to lift up an entire piece and not leave very many staples behind. This was a real blessing as the real hard part from earlier in the week was pulling out the staples. I had bought a new nail pulling tool, just to help pulling out the staples, fortunately I didn't need it as much. I tried cutting pieces three squares by three squares, and that was pretty easy too. I found out that three squares by four squares was NOT easy. So I just busted out the circular saw and cut back down to three by three. I also learned that since there are a lot of staples along the edges of the sub-floor sheets, it makes sense to cut large pieces on the inside of the stapled edge, and leave a two inch or so strip where the large quantities of staples are and just pry that section out a little at a time. That worked well as I couldn't get all the way to the edge along the wall, or under the cabinets. The new flooring was "coved" under the cabinets. When we started pulling up the linoleum we found a piece of wood nailed along the edge at a forty-five degree angle. We had to pry that board out and peel the yellow linoleum off the wall. One thing I was surprised to find is that the sub-floor extends under the pantry cabinet. We'll need to clean that up really well before installing new sub-floor. The biggest problem I haven't solved is how to keep the sawdust from making a mess all over the kitchen. I did sort of plan ahead and put the box fan in the back sliding glass door opening and open the window over the sink, and opening the front door, in order to force the dust to flow through the kitchen and not settle all over the place. I was marginally successful, but there is still dust in places there shouldn't be dust.

Ever since we replaced the stove ten years ago, we knew that there was brickwork pattern linoleum hiding under the yellow squares. When they installed the yellow linoleum they didn't completely cover the old tile under the stove, so it showed about two inches but we never saw the whole pattern. At one point tearing out the three by three squares we didn't put the pry bar all the way under the bottommost sub-floor and accidentally separated the newest floor from the second oldest.


If you look carefully you can see where I cut back the brick pattern and scraped off the glue between the brick and the original linoleum. I'm hoping to get a better view of that original linoleum. You know, sort of a history of linoleum in this home. I'm thinking about hiding some of the original linoleum under the new floor. Just to give the next homeowner a sense of how far their house has come since it was built. I feel like that guy in the Warner Brothers cartoon "One Froggy Evening" where he is tearing down a building and finds a dancing and singing frog. No one believes him, so he ends up putting the frog back in the foundation of the new building going up. Fast forward to the future and the future guy is tearing down the building using a ray gun, and this dancing and singing frog jumps out. This would be like that, except it wouldn't be a frog, it would be linoleum, and it wouldn't be singing, or dancing. OK, it's nothing like that. I guess this blog is sort of my way of making sure people believe me when I say that I have three layers of flooring in my kitchen.


Hopefully tomorrow I can get some yard work done before going at it some more. I am encouraged by the significantly reduced amount of work it takes to pull out squares of linoleum and sub-floor in the kitchen. There is still some thought that can be applied to improving the edges of the sub-floor and making it easier to get out. I'm thinking that maybe intentionally sawing through the staples by passing over the area with the saw every half-inch or so. Oh, and it will be really cool watching the sparks fly when I hit those staples!

Wednesday, July 18, 2007

Down to the Plywood!

Last night I figured I had a few hours so I would rip out the rest of the wood tiles. There were about eight rows of four tiles left, so I figured I could take out the tiles, place them in the newly empty garbage can and get something else done. Instead of getting down on my hands and knees, I realized I could use a shovel to catch under the tile and pry the whole thing up in one pretty easy motion. That worked pretty well until I started to get close to the front door. For whatever reason the tiles nearest the front and garage entrance doors seemed stuck to the sub-floor really well. I got out the pry bar and sledge hammer and got a tile up. Well, a tile and a LOT of the sub-floor. I could see the underlying plywood. It had a Grey color and splattered with drywall mud from when they first put it in years ago. Suddenly my 1 hour project had become complicated. Do I just clean up around where I had dug all the way through, or do I proceed to step two, taking out the sub-floor. At that point I was brimming with strength, had a helper and it was still light out. I got out the circular saw and set it to the right depth to cut through the remaining wood tiles and the sub-floor without going all the way down to the plywood. I put down a tarp between the entrance walkway and the rest of the living room, good thing because as soon as I hit those wood tiles with the saw there was smoke and dust filling the room. Apparently my saw blade was a bit dull, and when I would hit the metal staples holding the sub-floor to the plywood there would be a shower of sparks. I proceeded to saw out wood tiles and scrape up pieces of sub-floor. I started to have the sinking feeling that this was going to be a long night. When the sub-floor was installed it was lightly tacked down with nails, then stapled every where, I guess to reduce squeaking. When I would pry up a wood tile, it would leave behind the staples in the floor. My son and I finally got down a good technique that he would clean out the remaining wood from under the staple and I would pry it up with the pry bar. We vacuumed up and it looked pretty good.


Now I had another choice, do I call it quits for the night, or do I saw the rest of the sub-floor so we only have to clean up the living room once for this part? I decided to go for it and saw the 3/16" particle board in one foot by four foot strips. Once it was cut like this, it was a piece of cake to pry it up and not have it break in to little pieces. This made it easy to get the sub-floor up, but still left behind hundreds of 1 1/2" long 3/16" wide staples. Unfortunately my helper had to go to bed, so I kept on working in order to not leave an obstacle course for my family to have to navigate while I am at the day job. I quickly found out how much help my helper really was. The stubborn staples required at least a screwdriver and sometimes a pair of vice-grips to really get a good hold on the staple then pry it out with the pry bar. This process ground do a painful crawl as I had to pry up the staples, clear out the remaining wood junk and check for more staples. Of course I was clearing the staples IN to the area I was working on, so the pile got deeper and more difficult to find the staples. When I finally tried to stand up, I realized that sitting at a desk all day typing and moving a mouse around all day does not prepare you to crouch on your hands and knees for hours at a time. I was able to get all of the staples out of the floor and sweep up the floor before I went to bed. I did a final sweep AFTER I put away all the tools and found a few errant staples, so I'll have to get those tonight.

I am leaving the living room carpet in place for now until I can have some help moving furniture around in there to get up the carpet. I have a bad feeling that the pad of the carpet is held down with the same kind of staples. I am also pretty sure the kitchen has the same staples. So my next tool to buy is the right pry bar to get under the staples and take them out with a lot less effort. I think I spent more time pulling out staples than wood last night.


The next piece of the demolition to take on is actually sawing through the multiple layers of linoleum and wood sub-floor in the kitchen. My coworker suggested that I spend the bucks and get a five-pack of saw blades since the glue used to hold all that together will certainly gum up the blades and make them less efficient quickly. He also suggested that I get Carbide tipped blades so that when I do hit the staples it doesn't immediately dull the blade.

At this point I estimate the tear out is 1/8th done, so it's going to be a long haul one evening at a time, so I am planning on taking at least one day off next week to really get at it. I really need to figure out a way to not distribute the dust from this project throughout the house. I need to hang a tarp closing off the hallway and the living room. Set up the fan in a window in the kitchen to suck out the dust as soon as possible.

Well, back to my real job.

Later I added some photos in this post, and added a link to the web page album on the right.

John

Tuesday, July 17, 2007

Getting Started

Well, I finally did it, no turning back.

For a long time we have wanted to replace the flooring in the living room and kitchen. We have put it off for a variety of reasons, don't know what we want, don't have the time, well if you do the floors you have to do the cabinets, etc. etc. etc.

A little history:
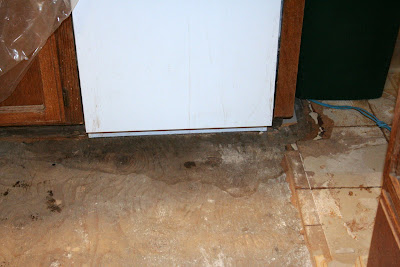
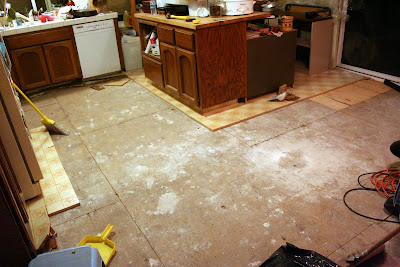
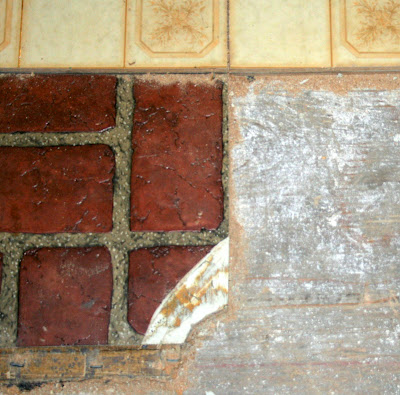
We have lived in our home for 12+ years. In that time we have had two babies grow up to be medium size children. We have eaten lots of dinners in the living room, and spilled on the carpet. We have moved kitchen appliances around in the kitchen and scraped up the floor. We have hated working so hard to actually keep the floor clean, all of that led us to making getting the new flooring a priority, and then building up from there. When we tried to put a new dishwasher in the old dishwasher's spot, it wouldn't fit. When we got new dual-pane windows, and sliding glass door I noticed that there were at least three layers of linoleum on two distinct sub-floor levels.

I finally bit the bullet last night and started ripping out the living room floor. We are pretty sure that we are going to use "Engineered Hardwood" as our flooring, and we know that we need to get down to the plywood over the floor joists and build back up.

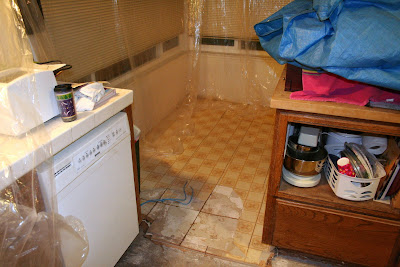
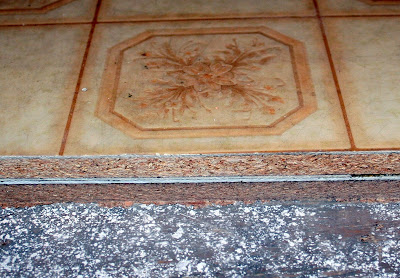
The top layer of the kitchen is a yellowish linoleum, with brown squarish things. The living room is a combination of wood tiles (along a four foot wide walkway from the front door to the kitchen) and brownish/black spotted carpet(not when it was new :) ). The carpet used to be held down by standard tack strips, but the carpet edge along the wood tile walkway has frayed, so the nails of the tack strip showed (and poked your feet) through.

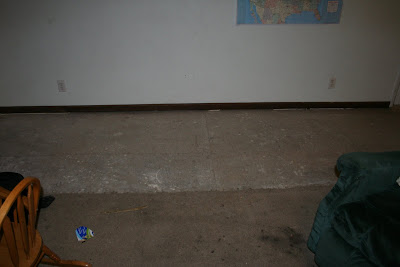
Last night I felt so refreshed from a nice dinner with the family that I ran over to Home Depot and got some demolition tools. Sledge Hammer, Pry Bar and Knee Pads. I was thinking that at a minimum I could get the really bad tack strips taken out, if I was feeling really adventurous I could take out all the tack strips along the walkway edge.


I was pleasantly surprised how well the pry bar ripped out the carpet tack strip. I easily took out the four foot section that was causing many poked feet and knees, then I realized that the pad below the carpet also had a tack strip, so I ripped out that four foot section. This took about 3 minutes! My son was really helpful, pulling back the carpet for me to work, getting the vacuum to clean up years of accumulated crud and decomposing carpet and pad.

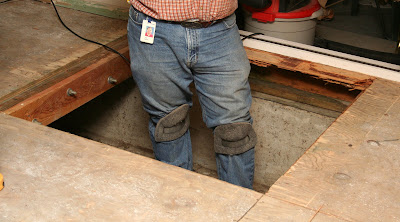
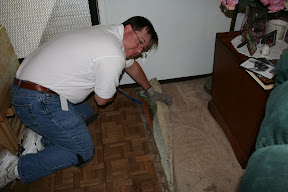
I was feeling invincible, I was thinking I could rip that whole room out before bed time. I thought I would at least see how much work it would be to rip out one of the one square foot wood tiles so that I would know how much I would be up against later in the week.

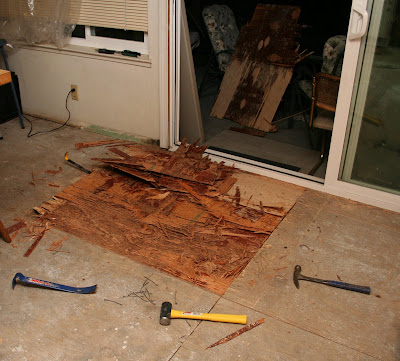
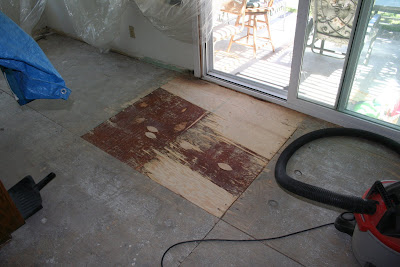
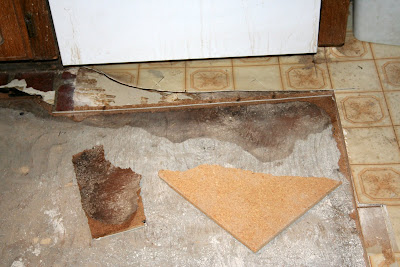
As I held the wonder bar in just the right spot, I had my son whack the far end with the sledge hammer, at first he said "it's just bouncing off the curved end" I assured him that he was doing what I wanted. I wanted to separate the tile from the linoleum I thought it was stuck on top of. Well, I guess I was supposed to separate the Linoleum from the sub-floor and throw the whole thing in the trash. It came up very cleanly as a 6 inch by 12 inch rectangle, black glue (mastic?) on the sub-floor and the back of the tile.


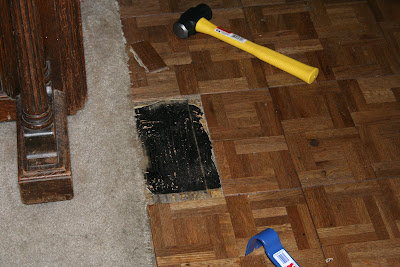
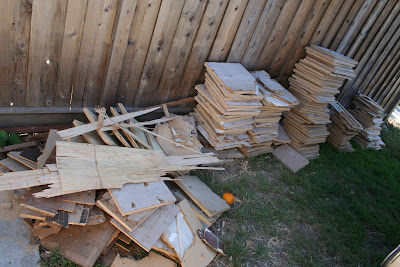
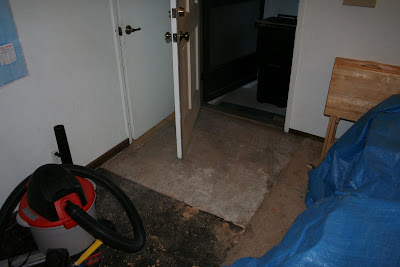
I now had a good place to grab the rest of the tile and pry it out. Again, I was feeling adventurous, so, with my wife's permission, I removed as much of the wood tile as I could fit in the garbage can that night. Fortunately trash pickup was the next morning, so I put all of the household trash in the bottom, then crammed the tiles on top. Once the first tile came out, it was pretty easy to get the wonder bar under an entire tile and pop it out individually. My son gave me the "one row left" warning, so I ripped out one last row of four tiles and threw them in the trash. There was very little leftover junk on the floor, very little of the linoleum was left behind as it was stuck really well to the bottom of the wood tiles. The sub-floor was mostly intact, with a few spots where the wonder bar dug in a little too deep. After a good vacuuming we threw an old blanket over the sub-floor to not have to step on the glue.

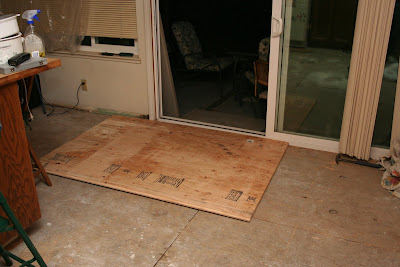
So, next step is the remove the rest of the wood tiles, then remove the sub-floor. The hope is that the sub-floor is nailed or stapled to the floor, and not glued down. If it is glued down, there will be a lot of junk left on the plywood. However it is most likely that it's nailed down so there will only be a few holes left behind. I've been told that the easiest way to do this is to use a circular saw and saw almost all the way through the particle board material "scoring it" so that it is easy to break out. This same approach will be used to remove the multiple layers of linoleum and particle board in the kitchen. I figured it would be easier to start in the living room with no appliances or furniture in the way, then use what I learn to get the job done in the kitchen.

I hope to post some progress pictures soon.

God Bless,

John