The plywood installation completed Saturday morning about 11AM. We had to buy some more plywood, because we just didn't have enough. It turned out that we needed three additional 4x8 sheets of plywood, we originally had 16 making the total 19 sheets used, with a little wasted material trying to fit in special areas etc. (This will be important later, note the foreshadowing)
I uploaded a video of the plywood underlayment stapler in action.
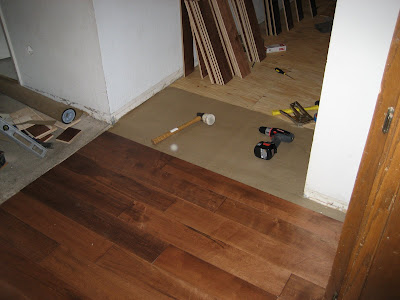
After we completed stapling down the plywood, we put down the tar paper for a moisture barrier. Apparently it also acts to quiet the floor some as well. It is a piece of kraft paper, a layer of tar, and another piece of kraft paper. When you look at the floor in progress pictures, you'll see a greenish/brown paper laying on the plywood underlayment. It is four feet wide and we put down one line of it to start.
The most drawn out part of the day was getting the proper initial measurements to set the first line of boards. Over and over it is emphasized to not use the wall as a guide, rather find a couple of places along the wall and measure out 1/2 of one board width PLUS a 1/2 inch expansion space. In our case that makes 3 inches. However the wall is not straight, and the sliding glass door is set back a little way from the drywall. We marked a few places, then used a chalkline (had to go buy one since I hadn't asked anyone to bring one of theirs) to snap a straight line as a reference. Since the marked points are from the wavy wall, some of them are inside of the line and some of them are outside of the line. The line is the reference for all of the boards along that first row. We then had to measure the actual width that the first board needed to be. Oh man this took a long time, then we made one wrong and had to do it again. The biggest problem is remembering which edge of the board to measure from since there is a tongue on one side and a groove on the other, you can't just turn them around if you measured wrong.
Eventually we had a board cut to the right dimensions to attach it to the floor. Since the first run is usually two or three inches from the wall, the special air-powered wood floor cleat nailer was too big to get in and be used. We had to pilot drill and hammer in 1-1/2" finishing nails. The pilot drill was a nail with the head cut off. Once the first board was nailed down, we could move on to the board next to it. Again, since the wall is wavy, we had to measure again to be sure that the board would end up with about 1/2" clearance from the wall. This space gets covered by "quarter-round" molding eventually. This proceeded for what must have been an hour, maybe more. It may have taken a while, but it was important not to rush it, as any mistake there would offset the next row etc. etc. so I wanted it to be right.
Once the first row was top-nailed, we could actually start using the cleat nailer. Cleats are like a flat nail with an L shaped head. They are designed to be driven at an angle through the tongue end of the board, between the tongue and the top of the board. This holds it solidly, but can be covered up by the groove of the next board. This leaves no nails on the surface of most of the floor.

Seeing these cleat nails in a row like this reminds me of when I was a kid and my dad and I were at a parking lot with a construction site adding on to the strip mall. We looked on the ground and there was a lot of litter, and in the litter there were these strips of nails, all glued together at an angle. We figured it was trash so we grabbed a few strips and took them home. We had hundreds of these nails, apparently the guys using them just threw out partial strips when they were done for the day or something. Well let's just say, any time a project required a nail, we knew exactly where to get one!
The biggest problem with installing this flooring material is that it comes in random lengths, at least seemingly random. You can open a box and you'll have a lot of long pieces, and another box will have a lot of short pieces. We would keep three boxes open at a time to be sure to have the variety we needed in order to not end up with two seams matched up from one row to the next, within six inches. This allows the seam of one row to be held tightly by the groove of the next row being complete. This gives the floor strength, and it makes the floor have a much more random look, not repetitive like tile for instance. Finally someone had the great idea to stand it up along the wall and be able to see how long the boards were and find that there were really about seven different lengths, and knowing that you could select the boards you needed much more quickly. Since the board length didn't always add up to exactly the width of the room, we would have to cut a little off the end of one board at the end, and usually use that cut off piece to start the next row, not wasting too much material. Once we got in a pretty good pattern of putting in pieces, tapping them in place with a pounding block (discarded piece of material) and cleat nailing the main floor of the kitchen went pretty fast. Then we got to the counters.
The area under the dishwasher does not get any hardwood. Just the new plywood underlayment. This required that we drew a straight line across where the lower front of the dishwasher would end up and place our boards right on top of this line. There were other special areas, like around the stove and getting back in where the refrigerator sets.
Eventually we had to call it a night since it was 10 o'clock and we had to use a power saw.
We had made it to the entryway to the living room.
No comments:
Post a Comment