I took the day off from work today to do a complete removal of the old rotted plywood and get a new piece in its place. It wasn't as simple as it sounded.
First I had to remove all of the external stucco that was aligned with the piece of plywood to be taken out.
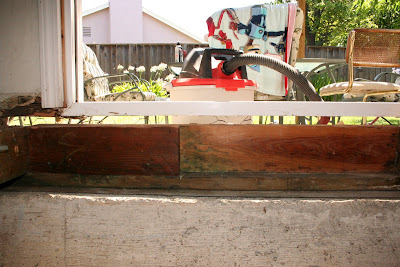
It didn't really take that long to bust out the stucco using a mason's chisel. I used a borrowed "sawzall" to cut the nails under the sliding glass door frame holding the old plywood in place. Once those were cut, it was pretty easy to pull out the rest of the rotted plywood. I spent a lot of time cleaning out other pieces of wood that were also rotted. I probably could have spent another whole day cleaning out bad wood and replacing it, but there comes a point in a project where you just have to stop. Fortunately my contractor friend had given me more than enough copper green for the other water damage, that I could soak these newly found water damaged parts.
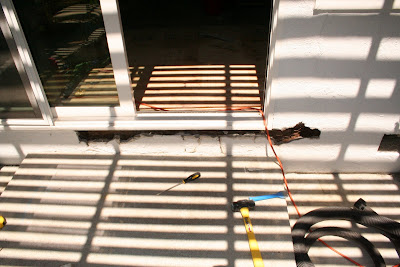
After I cleaned out all of the wood, stucco and caulking there was daylight coming through from under the door frame where the plywood used to be.
As much work as that seemed, that was the easy part! The primary reason that I busted out the stucco was to be able to make it easy to put in the new piece of plywood. Since the plywood is tongue and groove, I actually had to get the plywood all the way in and past the tongue of the existing floor, then slide it back to engage the tongue of the new piece. The tongue is about one inch long, so I had to go at least that much past where the piece would end up, then slide it back. Slide isn't exactly the right word, sledge hammer, grunt, groan, moan is probably a better word.
If you look at the picture from inside to outside you can see that not only does the plywood have to fit under the door frame, it has to fit under the wall on the left (from inside) the door frame is flexible plastic, the wall isn't flexible. I had cut the piece of wood width wise to fit just fine, but when it came time to put it under the door, the inflexible wall wasn't as forgiving, and since the wall had settled a little, there wasn't 1-1/8th inch, there was more like 7/8ths. Well, there was nothing more to do than force it!
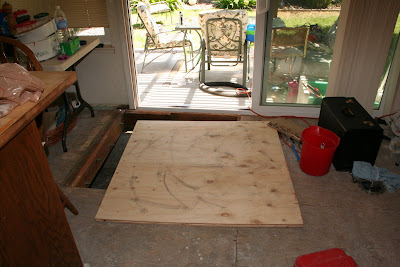
I got out the construction adhesive that was recommeded and put a bead all around the opening and on the wood under the door that would be hold up the new piece of plywood. I put white caulking on the top of the plywood and the underside of the door where I knew they would meet up. I put the plywood in the opening and had a long way to go, I was about three inches from where I needed to be. The problem was that the plywood had a slight bow to it and it caught the support wood from underneath on the left AND the right. Without a helper to pry the wood up while I hammered it, I was getting worried. I looked around and found my son's old toy dump truck, it was just the right weight to hold down the prybar on one side as I hammered in a screwdriver to act as a guide on the other side. Now I could go back in the house and use a piece of wood and a sledge hammer as a driving block and start forcing the plywood in to place. There was no turning back, the construction adhesive and the caulk were starting to set up. I hammered it until the groove went past the tongue and the whole piece of plywood dropped nicely in to place. Now I had to slide it back one inch to engage the groove of the new piece over the tongue of the existing floor. Again, having busted out the stucco was the only way to get to the plywood and pound it back in to place using that same piece of wood block and a sledge hammer. Once it was engaged enough, I could put in some screws. It had been recommended to pre-drill the screw holes so that I wouldn't have trouble putting in the screws. I had chosen the wrong drill bit and ended up making the one drill hole so big that the screw didn't even engage the wood, it just dropped right in to the hole I made. Fortunately I hadn't drilled too many holes or I would have had a problem. I chose two sizes smaller drill bit and it seemed to work OK. I ended up putting about 12 screws back in place, basically mirroring the nails that were holding in the adjacent pieces of plywood.
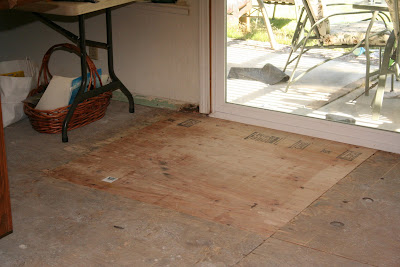
Now I just have to run a bead of caulk along the top of the plywood outside under the door frame, then replace the stucco. I'm going to do that another day :)
No comments:
Post a Comment